How to draw a Horse hoof with this how to video and step by step drawing instructions. Easy drawing tutorial for beginners and everyone.

Please see the drawing tutorial in the video below
You can refer to the simple step-by-step drawing guide below
Step 1
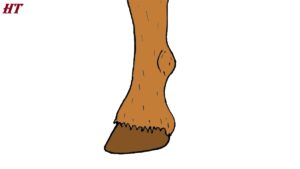
Before starting any lesson, you must first consult and observe the horse’s hooves. You should always carefully consider the structure of the spurs, heels and hooves. The image above clearly shows you the three strongest and most noticeable points of the hoof. Knowing exactly where to put these is important.
Step 2
Let’s find out how the nail structure is shaped when viewed from the front and slightly ¾ view. Notice how the upper ankle begins to bend and begins to grow into the bulk of the hoof. If you look at the hoof from the side, the ‘ankle’ forms what is called the ‘ergot’, which is essentially the hook that protrudes from the top of the hoof. Because the nails are separated by light hairs, you must draw lightly detailed lines to indicate this.
Step 3
When using thin lines to detail the ankle (ergot), you must note that there is a raised groove coming off the side. Remember I mentioned that ”the ankle forms what is called an ergot from the side view”? This is what I’m talking about, the ‘ergot groove’. If you want to draw a realistic horse, keep in mind the various details required for drawing as mentioned in the image above. For example, use light detail strokes for the hairy seam of the hoof and light line details to define the hoof.
Step 4
Now, since many amateur artists make the same mistake of placing the spur too high or too low, I’ve sketched a few examples to show you where to place it correctly. The first mistake is to draw the ergot too high as well as too small in size. The Ergot looks too small, which is not anatomically correct because the horse would not be able to balance correctly relative to its weight. The second wrong way is to draw the spurs too sharp and low. This is also impractical for balancing a 1 ton horse. The correct way is to draw the spur, in the center of the fetlock, with a balanced size and a nice continuous curve that transitions into the hoof. Perfect!
Step 5
So what about the ‘Dos and Don’ts’ of hoof shape? Here, I list some examples that I observe for many novice artists. Note that all the hooves are asymmetrical compared to the actual way they are supposed to be drawn. These variations are acceptable if the horse is drawn in an extremely cartoonish style. Make sure when you draw the hoof, there is a slight, healthy ‘bump’ that curves outward (like a fused dog paw) and make a slightly flat line to form the sole, then curve back up to create sharp nails. Perfect hoof shape!
Step 6
If you like simple hoof drawings, here are a few examples of one of many simple hoof drawings. There is very little detail on the hooves and feet. This type of style would fit perfectly with cartoon drawings of horses.
Step 7
Let’s begin. This step is the bottom of the leg and hoof in one step. Start with guides for the legs, then draw small shapes as hoof guides. You will then determine the actual shape of the hoof, then draw the front lining of the leg. Finish the legs by drawing the back of the legs and then adding lining to form the hooves. Erase the guides and you have yourself some nice looking hooves.
Step 8
Now let’s do a sing set. Again, draw a guide line for the leg and then a guide shape for the hoof.
Step 9
Draw the shape of a hoof, and you’re done.
Step 10
Start drawing the ankles for your horse’s legs and then move on to the next step.
Step 11
In the final step, you will sketch the hairline at the base of the nail and then add detail to the base.
Complete
Color the Horse hoof.


