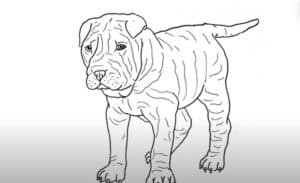
How to Draw a Shar Pei Dog with this how-to video and step by step drawing instructions. Dog Drawing tutorial for beginners and all.

Please see Shar Pei Dog drawing tutorial in the video below
Shar Pei Dog Drawing Step by Step
Step 1
We’ll start by sketching out the actual shape and structure of your Shar Pei’s head. Once that’s done, draw the little floppy ears.
Step 2
Now we will work on the face. Now, this breed also has wrinkles, folds and wrinkles on the face, so you have to start with the eyes and then draw the boxy muzzle. Once that’s done, draw the nose and all the wrinkles, folds and creases on the face. Finally, outline the beard holes on the lips.
Step 3
The head and face are done, which means we can work on the body. Outline the thick wrinkled neck, followed by the front leg first. Take your time as you outline all the layers of leather that have just been folded or stacked as you see here. Drawing in the following line is fine.
Step 4
Draw the remaining front leg and then draw in both front legs.
Step 5
Continue drawing the dog’s back by drawing the belly, hind legs, and hind legs. Again, take your time to draw the folded skin layers.
Step 6
We’ll finish our Shar Pei by drawing the hind leg and other paw, then sketching the curled upright tail. When it’s all done, you can erase your mistakes if you make them.
Step 7
This is how you draw a Shar Pei when you’re done. You can choose to color it in any shade you like with a dark muzzle.


