How to draw a hawaiian flower with this how-to video and step-by-step drawing instructions. Learn to draw flower for beginners and all.

Please see hawaiian flower drawing tutorial in the video below
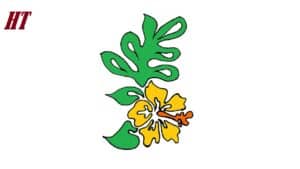
Now you will learn how to draw a Hawaiian flower. The Hawaiian Islands have rich flora and fauna, but several species are endangered. Some plants only grow in Hawaii and are not found anywhere else in the world. Many plants grow in this area, including very beautiful flowers. One of these flowers you will draw in this tutorial.
This lesson is tailored for children and aspiring artists. The simple lines used here can be easily repeated. The leaves have an unusual shape. The flower consists of five petals and a stamen in the middle. Follow all the steps consistently and you will have great results.
Hawaiian flower Drawing Step by Step
Step 1. Draw the upper part of the leaf.
Using a smooth line, draw the upper part of the leaf, which has three branches.
Step 2. Add the middle part of the leaf.
Draw smooth lines on both sides of the leaf, as in the example.
Step 3. Draw the bottom part of the paper.
Using smooth, rounded lines, draw the lower branches on the paper.
Step 4. Sketch two petals.
Below the leaf, draw two petals with a smooth wavy line.
Step 5. Add two more petals.
Just below, add the next two petals in a smooth line.
Step 6. Add details.
Draw the last petal with a smooth line and add the inside of each petal with a wavy line.
Step 7. Draw the stamens.
Description of long stamens turned to the side.
Step 8. Add details.
Sketch two small leaves and draw narrow holes in the large leaf.
Step 9. Color the flower.
Use green for the leaves, yellow for the petals and orange for the stamens.


