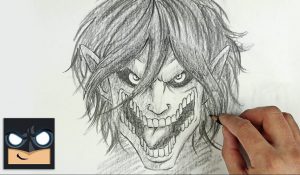
How To Draw Eren Titan by pencil with this how-to video and step-by-step drawing instructions. Easy drawing tutorial for beginners and everyone.

Please see the drawing tutorial in the video below
You can refer to the simple step-by-step drawing guide below
Step 1
Start by creating two shapes, one for the head and one for the shoulders. You will then outline the contours of the face as well as the shape of the jawbone.
Step 2
Let’s move on to drawing Titan’s mouth and nose. I started by sketching the nose first then moved on to the shape of the upper jaw. Take your time with this, as this is only a preliminary stage of Erin’s Titan form, until we sketch the eyes and head. The nose will act as a proportional stabilizer to guide us in the correct execution of the rest of the face.
Step 3
Next, let’s draw the eyebrows for the eyes that we will place next. Make sure that the outer support lines are thicker than the ones we used to define the rest of the face. Note that the small wrinkles that roll up near the nose area are required to be drawn! This makes the angry expression on his face look more intense.
Step 4
Then the most fun part! Let’s draw the shape of the lower jaw inside. Take your time for this step, because the shape of this function is important. Don’t forget to outline that attached piece of skin.
Step 5
Time to do the rest of the function! Using your guides, draw along the shape of the teeth and move up the contour of the hair. Make sure you also draw the individual teeth in order.
Step 6
I know, all of that looks depressing. Do not worry! Let’s work little by little on the hair, starting from the ends. Work on the tapered and jagged lines as they will create the sharp razor blade effect you see in this step. Use thinner lines to define the inside of the hairstyle.
Step 7
Finish the hairstyle by outlining the razor-edged end.
Step 8
He looks great already! How’s your drawing? Now that we’ve reached this point, let’s tackle the hardest parts of this tutorial. I know the neck looks a bit too detailed, but by working on every detail you’ll realize it’s not so bad. First, outline the outline of the neck/shoulder muscles. Once done, outline the collarbone. Since we drew the basic shapes first, we can go ahead and sketch out the detailed lines to connect the neckline to the collarbone.
Step 9
Finally, draw the shapes of the muscles before actually defining them. It is important to draw basic shapes before defining the muscles.
Step 10
There’s no need to mark up your drawing, and after you’ve reviewed it, you’ll have something similar to this. I recommend using a black marker or a ballpoint pen for inking (if your budget is low). If you can make enough money to buy Prismacolor markers or Micron pens, by all means, do! Squid takes a lot of practice to master. Even if I haven’t gotten where I want to be with the ink. I hope you enjoyed this lesson; I had so much fun creating it. If you have any suggestions please let me know, I am open to anything and everything by reading all your emails and comments. Thank you so much for watching and stay safe!


