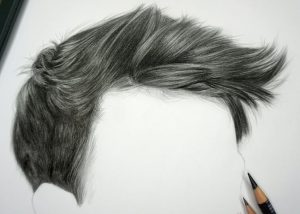
How to Draw Short Hair easy with this how-to video and step-by-step drawing instructions. Pencil drawing tutorials for beginners and everyone.

Please see Short Hair drawing tutorial in the video below
Short Hair Drawing Step by Step
Step 1
Head Contour Draw the shape of the head from the side. You can use this guide to know the ratio. Remember to draw both the ears and the neck in this step. I used a 4B pencil so you can see my lines clearly. If you end up afraid of lines being shown all the way through, use an HB pencil.
Step 2
Hair Length Decide the length of the hair you want to paint. In this example, the hair on the back and sides is the shortest, while the hair on the top of the head is the longest. Once you’ve decided on the length, take a blunt 4B pencil and use the shading technique to contour the hair. Make sure the distance between the hair and the head is appropriate.
Step 3
Separating the top hair from the sides Erase any contours you have created for the head and then use the HB pencil to create a contour that separates the side hair from the top hair.
Step 4
Overall light If you don’t want to lose the overall light, use an HB pencil to shade the areas of hair that you want the light to hit and then shade around those highlights. You can shade with a single tone, or go a step further and introduce darker tones. I used a blunt 4B pencil for that.
Step 5
Grouping, Layering, Line, and Shading If you did step 4, use the 4B pencil to layer the hair groups starting from the swirl at the back of the head. If you did not do step 4, use an HB pencil. Make sure you always keep the overall direction/flow in mind when drawing. You can include an entire side of the head or individual pieces of work. I stop as soon as I get close to the area where I want the most light. When you start shading, start by defining the darkest areas before drawing each hair (sharp 6B).
If you happen to be passing through an area where you want most of the light to hit, don’t use tones that are too dark. After you have defined the main shadows, start drawing each strand of hair. Naturally, you will begin to divide large groups into smaller groups and you will find ways to incorporate overlapping strands and other unique and interesting patterns. For each hair, I used a 0.5mm 4B mechanical pencil.
Step 6
Repeat Continue working around those highlights. When drawing the nape of the neck, curl the strands towards the neck. For areas near the back of the head that don’t get a lot of light (your light source may be different), focus more on medium and dark tones instead of trying to define highlights/ shining. It’s okay if the hair doesn’t stand out.
Step 7
Grouping, Layering, Flowing, and Shading Working in small sections at a time, I drew layer by layer of large to medium hair groups. Working in layers helps me to carefully plan the direction and flow of my hair. In the image above, I shaded around the main hair groups, making some areas darker than others to show some depth.
Since this is the area I want most of the light in, I used a 0.5mm HB mechanical pencil and a 2B pencil to draw each hair.
Step 8
Correcting/Adding Highlights If you have shaded too dark or simply want highlights to stand out, roll your kneaded eraser into a ball, clamp a section so that it’s flat and sharp, then run the eraser along the areas you want to highlight as if you were painting white hair. The image on the left is before deletion and the image on the right is after.
Step 9
Grouping and Layering In step 2, if you can recall, I wanted the hair on the top to be longer than the sides. The longest hairs you will have to draw will be on your first layer. The following layers are superimposed by layer 1, so they will appear shorter. Step 10: Add Shadows and Separate Hair Use your creativity to define shadows along random areas of hair. These could be areas where you don’t know what to do or look awkward if you paint your hair.
You’ll know what I mean if you’re following along and applying this to your drawings. After you’ve drawn the shadows, use a mechanical pencil to divide the hairs into smaller groups until they start to look like individual hairs.
While you’re drawing strands, improvise and find unique ways to incorporate unfussy, overlapping, loose, and more hairstyles. If you enjoyed this tutorial and want to see more in-depth hair tutorials, give me your suggestions in the comments section below!
You can see drawing more:


