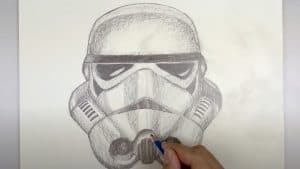
How To Draw A Stormtrooper Helmet easy with this how-to video and step-by-step drawing instructions. Easy things to draw for beginners and All.

Please see the drawing tutorial in the video below
You can refer to the simple step-by-step drawing guide below
Step 1
We’re going to take things very literally from the top when we start this tutorial on how to draw a Stormtrooper helmet.
You can start things off by drawing a thin and long brim that will run the full length of the helmet. Once drawn, you can add a curved line above it for the top of the helmet.
The top of the helmet will be quite rounded, but the actual top will be slightly flat. That’s all you need to do for this step, so now you’re ready for the second step of the tutorial!
Step 2 – Now, draw the top left side of the helmet
For the second part of this Stormtrooper helmet drawing, we will draw the upper left part of the helmet. First, we will draw the left eye of the helmet.
This will take the form of a triangular wedge with the thin part facing in. This eye part will also have some details inside of it to give it some depth.
Then use a straight line for the top of the helmet, and then this will extend to the filter section at the bottom.
You can then finish this step by drawing some circles on the top left. As it looks like in our reference image, we will continue to add helmets in the next section.
Step 3 – Draw the top right side of the helmet
This third step of our tutorial on how to draw a Stormtrooper helmet will help you mirror essentially what you did in the previous step.
That means you will draw another part of the eye along with the other parts of the top of the helmet. When drawing these elements, do your best to keep it looking as symmetrical as possible.
You can then finish this step by adding a curved line on the left side of the domed part of the top of the helmet. Then you can move on to step 4!
Step 4 – Next, draw the front of the helmet
The next steps of this Stormtrooper helmet drawing will be finalizing the details and elements.
First, we’ll start the part that’s going to go through the nose. This thin shape will be drawn using two curved, wavy lines joining at each end.
Then draw some lines along the inside of this flat shape.
Next, we will draw the beginning of the front vent of the mouthpiece for the helmet. Draw a rounded section on the bottom right of the helmet, then draw a small protrusion that is slightly indented into that part.
It sounds a bit clunky but it will be clear if you refer to the reference image!
Finish this step by drawing several thin vertical shapes of different heights next to each other.
Step 5 – Add Final Details to Your Stormtrooper Helmet Drawing
You are now ready to complete the final details and elements in this step of our Stormtrooper helmet drawing tutorial.
To start this off, you can mirror what you did in the previous step to recreate the vent section for the other side of the bottom of the helmet.
Then, once the helmet’s design is complete, we’ll finalize it by adding some curvilinear detail across the entire helmet.
These details will help the helmet look a little more shiny.
You can also keep this drawing going by drawing a cool background or some additional details to the image. How would you complete this amazing drawing with your own elements and details?
Step 6 – Finish your Stormtrooper helmet drawing in color
The final step of this Stormtrooper helmet drawing will be to finish it off with some color!
The classic Stormtrooper helmet design comes in a white and black color scheme, but in our example image we used a silver color scheme variation.
You can look for a similar look for your own canvas, but there are tons of different variations you can choose from from the movies and other Star Wars vehicles!
Would you choose a classic Stormtrooper helmet design or could create your own?
Your Stormtrooper Helmet drawing is done!
That should end this tutorial on how to draw a Stormtrooper helmet!
This helmet design has a lot of little details packed into it, so we hope that the steps in this tutorial help ensure that hat drawing is a fun and easy experience.
Once you’ve completed this tutorial and finished with this incredible painting, you can continue the fun of adding some details and elements of your own.
We only covered a few ways you can do this earlier in the tutorial, but you can really show us what you can do with your creative ideas!
Then when you’re ready to find your next great drawing challenge, you can check out our website for more drawing tutorials to enjoy.


