How to Draw Ruffles easy with this how-to video and step-by-step drawing instructions. Learn to draw for beginners and everyone.

Please see the drawing tutorial in the video below
You can refer to the simple step-by-step drawing guide below
Step 1
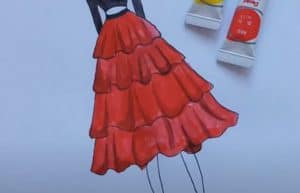
In this ruffle tutorial, we’ll draw a skirt with lots of ruffles covering the lower half of the body. For this first step, we’ll start with the left side of the dress hem.
You will do this using several curved lines that join together to form the layers of the dress.
We’ll expand on these later in the tutorial, so now you’re ready to move on!
Step 2 – Mirror what you did in the previous step
For this part of your ruffle drawing, you’ll mirror what you did in step 1. That should make it easier for you because you’ve technically done what you’re going to do in this step. !
Once you’ve drawn both lines of the dress, you’ll be ready to connect them with some details in the next few steps.
Step 3 – Add the inner details first
Now that you’ve drawn the outlines, you can begin the interior details of your painting in this third step of our fringe banding tutorial.
We mentioned that this dress will be made up of several different layers, and we’re going to create the first of these layers right now.
For the top of the dress, you’ll be using some connecting curves on this first layer to form the material that bunches up where it’s connected.
If that sounds confusing, it will become very clear when you refer to the reference image to guide you.
Step 4 – Now draw the next layer
We will continue to add some layers to your ruffle drawing in this section. In fact, this step will see you draw the first folds yourself!
To do this, you will use a wavy line to create the edge of these wavy lines, as shown in the reference image.
The better you can make these lines, the better! With that layer, you can start to see how we build the ruffle layers for the rest of the dress as we move on.
Step 5 – Draw the next ruffle layer
This step of our tutorial on how to draw ruffles will see you repeat the previous step. To do this, you will add another wavy line to form the next ruffle layers.
You won’t reflect the exact steps, but the idea should be the same. The wavy lines you’re drawing will help create the look of wrinkled fabric.
Now that you have this next layer, we can finalize the details in the next step, so let’s move on!
Step 6 – Now, add the final details
Step 6 of your ruffled drawing will see you add final details and elements before you start adding some amazing colors to it in the next step.
First, you’ll take what you did in the previous step and add another wavy line for the fringes at the bottom of the skirt.
As with the previous ones, you can change it up a bit to suit your preferences. Once you’ve drawn those wavy lines, all that’s left is to add some slight curves from each layer of the dress. These lines will help give the fabric some texture.
After you’ve drawn these details, you’re technically ready for the final step! Before you proceed, however, you should feel free to add any details of your own that you may want.
You can change up some of the smaller details to your own design, or even make larger additions like painting the background or the person wearing the costume.
These are just a few ideas, but what else can you think of to complete this ruffled drawing?
Step 7 – Finish your ruffle drawing with some color
The drawing is done, so now you can have fun adding some awesome colors to it in the final step of our tassels tutorial!
In our reference image, we have used different shades of purple and pink to color in the image, but this is just a suggestion that you can use
. You should feel free to use any color you want, though, as this is your chance to get really creative!
Once you know what palette you want to use, you can also have a little fun choosing the art media and tools you’ll use to bring them to life.
You can also use some fun crafts, incorporating things like stickers, sequins or glitter to really make this ruffled drawing pop on the page!
What colors and mediums will you use to make this picture look even better?


