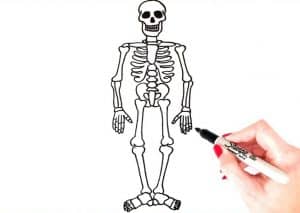
How to Draw A Skeleton easy with this how-to video and step-by-step drawing instructions. Easy drawing tutorial for beginners and everyone.

Please see the drawing tutorial in the video below
You can refer to the simple step-by-step drawing guide below
Step 1
Check out the tutorial on how to draw the skeleton at the top of this section!
We’ll start with the skull, and it’s worth noting that for this tutorial you may want to refer very carefully to our reference images as you draw.
Some of these factors can be tricky, but if you take it slow I know you can do it!
The skull has a rounded top as you can see in our reference image. After that, two sharp lines will appear for the cheekbones, and then you can draw another circular line for the jawline below it.
Step 2 – Next, draw eyes, nose and mouth
We will focus a little more on the skull for this part of your skeleton drawing. First, draw some circles to form the eye sockets of the skull.
You can then use a small curved boomerang for the nose below the eyes. Next, use some small and curved shapes to form the mouth of the teeth underneath them.
Finally, you can draw the neck bones segmented below the skull as they appear in the picture to draw your skeleton.
Step 3 – Now draw the chest and ribcage
The next step of our skeleton tutorial looks complicated, but it’s not too difficult if you go through it step by step.
First, draw some thin and straight bones coming out from below the neck to create some shoulder bones. Next, you’ll want to create the central breastbone, which looks like a fat ‘Y’ shape.
You can then carefully pull each rib out of this central bone, and then back up to the center.
It sounds complicated, but when you look closely at the reference image, things are easier to see! Each side should have four ribs and the picture will tell you how big or small each one is.
Step 4 – Next, draw the hips of your skeleton
We have the head, shoulders and chest of your skeleton drawing, so now we will move lower to the hips. First, widen the spine a bit by drawing a few small segments into it.
You can then draw the hipbone somewhat like a butterfly with some circles for the holes near the bottom.
Step 5 – Let’s Add Some Arm Bones
Time to start over as we draw some arms in this fifth step of the skeleton tutorial.
The arm is created with one larger bone on top and one smaller, thinner bone underneath.
Step 6 – Next, draw the hands
Now that you have your arm bones, you can draw some hands to draw your skeleton.
The hand is made into a single circle for the wrist, then you can add segmented thumbs and thumbs to them.
Step 7 – Draw some leg bones
The leg bones will be drawn similar to the arm bones from step 5.
The main difference is that they will be longer than the arm and of course they will also come from the lower part of the hip bone.
Step 8 – Complete the drawing with some pins
You are almost ready to move on to the ninth and final step of this skeleton tutorial!
Before you do, add some legs to your skeleton. They will be segmented like hands.
They are made up of two main parts, which are larger and then have several toes at the end.
Once they’re drawn, you’re almost done with your skeleton drawing! Before continuing, maybe you could draw a fun background to go with your skeleton!
One idea might have him dancing in the graveyard scene, but what other backgrounds can you think of for this painting?
Step 9 – Now finish your skeleton with some color
Now that your skeleton is fully drawn, you can have fun coloring it! We used a simple gray color palette for our image, but you should really feel free to use your imagination for this image.
If you’re feeling too ambitious, maybe you could try using a different color for each bone of the skeleton!
If you have drawn the background or extra elements, you can also color your picture. What artistic medium will you use for your painting?
I’m going to use watercolors for a more spooky feel, but it would look great with some brighter mediums!


