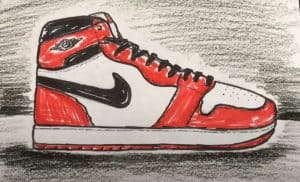
How to Draw A Jordan Shoe easy with this how-to video and step-by-step drawing instructions. Easy drawing tutorial for beginners and everyone.

Please see the drawing tutorial in the video below
You can refer to the simple step-by-step drawing guide below
Step 1
The shoes are often harder to draw than expected, and that’s even more so when the shoes have a lot of intricate details. We’ll cover all of that in this tutorial on how to draw a pair of Jordan shoes.
We’ll start with the outline of the top of the shoe for now, and then we’ll add more details as we go on.
To do this, you can simply use some irregular lines to draw the back of the shoe, which will result in the opening and then the slope of the front of the shoe.
There will also be a long, rounded shape near the opening of the lace details for the sneaker. Then we are ready to proceed to the next step!
Step 2 – Start adding some details to the sneakers
Continuing with your Jordan shoe drawing, we will now start adding some details. For now we will keep it simple and will draw a detail near the back of the shoe that looks like a strap.
To do this, simply draw some curved lines from the top of the back of the shoe going up towards the laces. Now that’s all, so let’s move on to step 3!
Step 3 – Next, add markup details
These sneakers are made by the company Nike and we’ll be adding their distinctive tick logo in this step of the how-to tutorial on how to draw a pair of Jordan shoes.
To do this, simply draw some slightly curved lines from the back of the shoe and extend inward.
They will curve at the end of the tick, as shown in the reference image. No Jordan shoe would be complete without this detail!
Step 4 – Draw the next details
In this fourth step, we will continue to add some details to the shoe. This will be a step where using a reference image as a guide will be very helpful as you work on your Jordan shoe drawing.
The details that we will be adding will be near the center of the shoe and will mainly consist of some slight curves that connect together.
Step 5 – Now draw the lanyard and other details
This step in our how to draw a pair of Jordan shoes tutorial can look complicated, but if you take it slow and follow the instructions you should have no problem with it!
To draw these ties, simply draw a long circular row that you drew back in one of the first steps. Some will be at different angles and some will be longer than others, so be sure to refer to the reference image carefully to make sure it’s accurate.
Then there will be some simple line details near the front of the shoe that you can draw now. Then we only have a few final details to add!
Step 6 – Next, you can add the final details to your Jordan shoes
Before you throw in some color in this image, we have a few final details to add to complete your Jordan shoe drawing.
First, you can use some curves to form the sole of the shoe. This base layer will also be quite thick. Then there will be some smaller details to add to it to really complete it.
These include adding some small lines to the base for some texture details. Then you can also add some dots to the toe.
That should do for the details in this tutorial, but feel free to add some of your own if you’d like!
Maybe you could draw a background showing what other gear you’ll get with these shoes.
Step 7 – Complete Your Jordan Shoe Drawing with Some Color
The final step of our Jordan Shoe tutorial will be to add some amazing color to your drawing.
In our reference image, we used a red, black and gray color scheme to fill the image. However, this is just a suggestion, and for this final step you should feel free to use any color you love!
This drawing is all about creating your perfect pair of Jordan shoes, so feel free to personalize it however you want. If you drew any other background details or additional objects, you can also color them.
What colors, art tools and mediums will you use to complete your amazing drawing?


