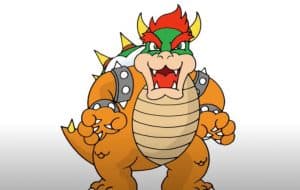
How To Draw Bowser from Mario with this how-to video and step-by-step drawing instructions. Cartoon drawing tutorials for beginners and kids.

Please see the drawing tutorial in the video below
You can refer to the simple step-by-step drawing guide below
Step 1
We’ll start off easy at step 1 like all my tutorials. Draw a large oval for Bowser’s body and a small circle above it for his head.
Step 2
Next, draw Bowser’s wide mouth extending over his head. This shape is a bit confusing and it can look confusing, but follow the image and it will appear soon.
Step 3
Now that Bowser’s head and mouth are in place, delete all overlapping principles from the previous steps. We’ll also need to draw Bowser’s lower jaw with a few jagged teeth inside his mouth. Don’t forget to give him some small nostrils at this step!
Step 4
Now it’s time to give Bowser some eyes. Draw two small halves above his mouth and a very thick eyebrow above each of Bowser’s eyes.
Step 5
Draw a few small lines in Bowser’s mouth and one pupil inside each of his eyes.
Step 6
Next, draw some slightly curved horns on top of Bowser’s head.
Step 7
Bowser has a large red mane that we will draw starting between its eyes, and running back down between its horns.
Step 8
At this point, Bowser’s first part is basically done. We can now draw the outline of each of Bowser’s arms.
Step 9
At the end of each arm, draw a large pea for Bowser’s hand.
Step 10
Using the pea shape of his hand as your guide, draw Bowser’s fingers and short claws. He has four fingers on each hand, and claws make up about half the total length of each finger.
Step 12
Next, draw a few loops around Bowser’s arms and one around his neck just below his head.
Step 13
On each of Bowser’s rings, draw a few small spikes to give him a subtle look.
Step 14
Next, draw a large half circle on Bowser’s back for his shell. As you can see in the picture, the Bowser also has a wavy border around the bottom of the case
Step 15
Thorns, thorns, thorns! Draw some more spikes on the back of the Bowser case. He really is a bad guy after all!
Step 16
Next, we’ll draw Bowser’s legs by drawing two sets of ovals below his body. These should be fairly wide and flat shapes.
Step 17
Like we did with his hands, let’s draw Bowser’s claws on his paws. The difference here is that he only has three claws on his feet instead of four on his hands.
Step 18
Draw Bowser’s chubby short tail behind his shell with… of course… add a few spikes on it!
Step 19
Finally, give Bowser a little color and he’s all set to steal Princess Peach! I hope you had fun drawing Bowser with me. If you enjoyed this tutorial, be sure to like it, share it on social media, and come back for more! And as always… have fun drawing!


