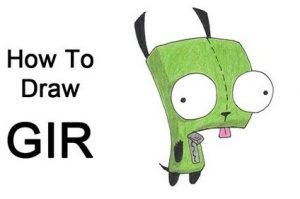
How to Draw Gir from Invader Zim with this how-to video and step-by-step drawing instructions. Cartoon drawing tutorials for beginners and kids.

Please see the drawing tutorial in the video below
As a complement to my last post on how to draw Invader Zim, today’s tutorial will be how to draw his faithful sidekick, Gir. Gir is the breakout star of the show, and one of the easiest cartoon characters you can draw. So without further introduction, let’s get to it!
What you’ll need:
- HB (#2) Pencil, 4B pencil
- Eraser
- Drawing paper
- Drawing surface
You can refer to the simple step-by-step drawing guide below
Step 1
Just like every other tutorial I’ve ever posted, the first step to drawing Gir is to break him down into his most basic parts. Basically, Gir’s entire body is made up of squares. So to start, draw a large square that will make up his head, and a smaller square (about 1/4 the size of his head), below it will become Gir’s body.
Step 2
After you’ve drawn Gir’s head and body, create his arms and legs by drawing simple ovals. Since this is a 3/4 view of the Gir, the arm furthest from you will not be visible and the same leg will be slightly shorter. This will create the effect that half of Gir’s body will be slightly further away from the viewer.
Step 3
In this step, you can also draw Gir’s eyes. We’ll make them by drawing two very large circles about the size of a quarter of his head. Gir’s eyes were directly opposite the center of his head.
Step 4
At this point you should have a map of most of Gir’s body and all the important parts drawn. Now you can add his ears, it’s just the little triangle. Draw his tiny tongue hanging just below his chin and a small oval nose right above it. Gir’s final detail is that the zipper on his outfit is just a couple of triangles located on his midsection.
Step 5
The final step in drawing Gir is to clean your lines, and darken his arms and legs. Congratulations! And don’t hesitate to email me YOUR drawing of the Gir at .com, and you might be on the front page!


