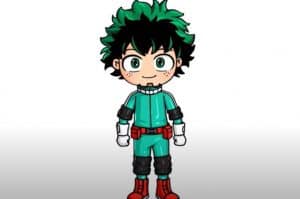
How to draw Deku easy with this how-to video and step-by-step drawing instructions. How to draw cartoons for beginners and kids.

Please see the drawing tutorial in the video below
You can refer to the simple step-by-step drawing guide below
Step 1 – Outline General Forms
If you suddenly did not watch My Hero Academy, now we will tell you everything step by step. Deku is an anthropometric character, that is, he has a human form and it would not be difficult for us to draw such a character. Let’s start with the chord string (assuming this is his spine) and draw it down the middle. At the top we will create an arbitrary oval, just below another oval (this is his body), and at the bottom, a third oval (this is the pelvis). ).
Step 2 – Outline Deku .’s limbs
This step is also simple. Draw the arms so they look bent at the elbows. Outline simple lines that will act as joints. Deku is in motion and his legs should work. Draw two straight lines, connected by small circles (these are the knee joints). Imagine Midoriya Izuku pushing away and jumping.
Step 3 – Outline the neck and back
Draw two diagonal lines. Designate a head-to-body transition – roughly speaking, this is the neckline covered by the collar of a superhero jumpsuit. Let’s create the initial shape of the suit with an arbitrary cylinder. Deku has gotten a little fatter, but its performance is nowhere to be found!
Step 4 – Sketching Deku .’s Arms
Deku has powerful fists, just the kind you need to fight evil! Draw a shoulder bundle, make a second layer for the arms, squeeze the forearms. Well, everything is exactly that, to draw an anthropomorphic character you need to know the basics of anatomy. At least in general terms. The right elbow should be protruding and slightly pointed. The fists are yet to be seen, but to begin with, just drawing the ovals should suffice (a bit like a boxing glove!).
Step 5 – Outline the legs
It’s time to draw the legs. Remember that we’re drawing the legs when wearing overalls, which means they’ll look tight and definitely thicker than the arms. Outline the lines along with the pivot lines, we specified the joints initially. Outline the knees with circles – these are the connecting parts of the human skeleton, arrange them so that the joints connect naturally. Draw the feet in the same way, taking into account anthropometric literacy.
Step 6 – Draw Deku’s Face
Let’s move on to the face. Deku is determined to win, his eyes are firm and full of calculation! Draw the eyebrows – two arcs “wrap around” the eyes from above, almost touching them. You can shade your brows a bit, so it’ll be more obvious when they’re hairy. Remember we drew two diagonal lines across the face? This is to see the center and draw the nose there. Therefore, symmetry will be observed on the face, and this is important. Line the mouth with a strip, leaving the edges straight, not bent. Raised edges will create a smile, and if they are pulled down, Deku will become sad. And in this lesson, we’re not sad, so we make the mouth a straight line.
Step 7 – Draw Deku’s Hair
Mess up our Deku’s hair. In the anime, the hairstyle gets special attention, so we have to do something special on Deku’s head. A little lifesaver: draw a hat in any shape, folding the corners as you like. The blot results are just the basis of the future hairstyle. Next, represent messy hair with triangular “light rays”. It looks like a fire that the wind blows from side to side. Our conditional “flash” looks in different directions. Create chaos, ruffle the feathers!
Step 8 – Drawing Deku’s Mask
Deku has a mask. It has an ear-like protrusion. Let’s style the collar and place it on the chest. Place the edges of the mask on the shoulders. The mask should be large but proportionate to Deku’s face. At the critical moment, our hero must put on his hero mask and show his super powers! Shade the bottom of the mask and leave a protrusion near the chin.
Step 9 – See the details of the waist
Let’s go to the clothes. This is a green jumpsuit and to draw it you need to draw a few lines above the shoulders, so we will visually expand the outfit. In the side area, bend the shape of the overalls, as if the fabric was rolled up due to the movement of the body. When the jacket has pockets, draw a handle.
Step 10 – Arm Details
The sleeves start from where the suit visually expands. Creating volume of the sleeve, the right hand should come out of the suit. If you don’t know what Deku looks like, here’s a hint – he’s, in fact, wearing black elbow pads. So visually we have to picture an elbow pad that is compacted on the sleeve. This is so as not to hurt the elbow during superhero outings!
Step 11 – Draw Deku’s Fists
Big palms clenched into fists because Deku is always ready to fight! Hands are well protected with white gloves. When drawing fists, mark the ends of the gloves, but do not connect them to the elbow pads. Leave some space for hand viewing.
Step 12 – Add some detail to the belt
Another detail of Deku’s image is his red belt. Draw a horizontal line as if enclosing the character’s pelvis. Leave the tails of the belt around the edges. By the way, do you remember what to do if you want to check the symmetry of your drawing? That’s right, look at it in the mirror.
Step 13 – Draw the knee pads
Elbow pads are for safety, but what if Deku suddenly injured his knee? Don’t let this happen and pull out the knee pads. They will look huge. Imagine you are drawing a connection between two pipes. Right, right, right, don’t rush to criticize! There is a thick layer on the outside of the knee pad – it protects the knee joint during unsuccessful falls.
Step 14 – Drawing Boots of Deku
Deku needs a warm-up for extreme speed and super endurance. Moreover, the shoes that must be chosen are strong, high-quality and massive. They also must not hang from the legs, or Deku will complain of blisters. The shape of the boot follows the shape of the foot. Make the sole thicker, otherwise the thin sole will not be able to guarantee the long-term safety of the shoe.
Step 15 – Remove the rule
So it’s time to give Deku a complete and clean look. To do this, take an eraser and clean the entire drawing from unnecessary auxiliary lines. Next, take a darker pencil or marker and carefully trace the line, making the lines bolder and sharper.
Step 16 – Coloring the Deku . Drawing
As you can imagine, Deku is a character from a popular anime series. This means that the color palette was created by the artists of this anime series, and we need to try to reproduce it accurately. However, of course, you can get creative and paint your Deku drawing in completely different colors from the original. This will make your drawing more unique and unusual.
That’s it, we’re done with the drawing tutorial! Deku looks at you and you look at Deku. He’s in a fighting stance, legs straight, fists sharp and clenched to the limit! The shiny dark green hair was messy, and like blades of fire, fluttered in the wind.


