Volleyball How To Draw easy with this how-to video and step-by-step drawing instructions. How to draw step by step for beginners and kids.
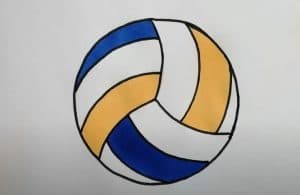
Please see the drawing tutorial in the video below
You can refer to the simple step-by-step drawing guide below
Step 1
The first step of our how to draw a volleyball tutorial will start out simple. To start, we will simply draw a circle.
Actually, drawing a perfect circle is not possible by hand, so there are some tools that can make it easier for you.
The best tool to use is a drawing compass, as it can help you draw a perfect circle by clamping a pen or pencil in it and using the pointed end to complete the circle.
However, if you don’t have a compass available, you can try some other options. For example, you can use a flat, round object to make makeshift stencils.
This could be something as simple as the lid of a glue stick or the lid of a jar. Whatever you end up using, you have several options at your disposal for creating a circle!
Step 2 – Draw some lines to guide you
For this volleyball drawing, you will need two things: a light pencil and a ruler. We won’t be using dark pens or pencils, as the lines you’ll be drawing won’t be in the final image but will guide you in the next step.
Using a pencil and ruler, you can divide the circle into three slices as you can see in the reference image.
With those things drawn, we’ll move on to the next step where they’ll help you the next few lines.
Step 3 – Next, start drawing the seams of the ball
Using the lines in the previous step, we will draw some curves in this part of the tutorial on how to draw a volleyball.
Starting at the midpoint created by the three lines, carefully draw some slightly curved lines over them.
While they will curve in the middle, these lines will start and end at the same points that straight lines do.
Unlike the previous step where you used a light pencil, for this step you can go ahead and use a dark ink or pencil, as these lines will appear in the final image.
Step 4 – Continue drawing seams for the shoe
Your volleyball needs some extra seams, so add some seams in this step! To begin this process, you will draw some more curves.
These curves will be in the left ‘slice’ of your circle. Each will have two side-to-side curves as shown in the reference picture.
Step 5 – Now, draw the final seams
For this part of our how to draw a volleyball tutorial, before you start coloring you can draw the final details. They will be similar to the lines you drew in the previous step.
The drawing will be finished with some more curves in the same position as the previous lines from step 4. With those strokes, your drawing is pretty much done!
However, before moving on to the final step, you can add some details of your own. Some examples will be drawn on volleyball brand logos that you can use in real life.
You can even take it further and paint the background for the image or have a hand about to take it.
What scene can you think of to paint this image?
Step 6 – Finish your volleyball drawing with some colors
In the last step of volleyball drawing you will have some fun coloring! While we already showed you one way you can color in this image, this is the step where you can show us how creative you are!
Volleyball comes in all sorts of different color schemes and textures, so you should really express yourself with your favorite color at this step.
If you painted some background details or extra elements in the previous step, you might as well have some fun finishing these elements with your colors.
You can even get into it with some of the smaller details.
For example, you could use some more precise art medium like crayons or pencils to create some weather on the seams using some gray or brown on the lines.
We can’t wait to see what colors, art mediums and final details you choose to perfect your volleyball drawing!
