How to Fix Asymmetrical Eyes by pencil with this how-to video and step-by-step drawing instructions. Pencil drawing tutorial for beginners and everyone.
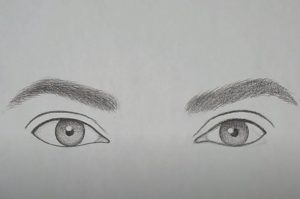
Please see the drawing tutorial in the video below
You can refer to the simple step-by-step drawing guide below
The first step is to choose your favorite eye so we can use it as a baseline. My favorite is the left eye, so I will change the right eye.
To fix this asymmetric drawing, we will need a long straight object. You can use a pencil, a ruler or even another piece of paper.
Pencil method
First, try doing it with a pencil. This is the tool I recommend for all 3 because I think it will help you develop your visual skills a lot faster, but it may take a little practice to understand.
The idea is to keep the pencil parallel to the paper edge. Hover your pencil in front of the drawing to see areas of the drawing that are not linked to each other. Once we do this, the mistake will immediately become apparent.
For example, we can clearly see that the outer corners of each eye are not aligned and we can see exactly how much we need to move it up or down so they match.
Move your pencil up and down along your drawing to check the horizontal alignment of other areas such as eyelid folds. It is very important when you do this to ensure the pencil stays at or parallel to the paper edge. This assumes that your object is drawn straight instead of at an angle.
Note:
If your subject is drawn at an angle, you will also need to hold the pencil at an angle. In this case, it would be helpful to draw an actual reference line on the drawing, so you can keep your measurements consistent as you work.
Here we can see how much higher the left eyelid wrinkles are on the right (about 2 mm apart). As you go along, check the horizontal alignment of your drawing, making the appropriate changes.
There will be some practice to get used to using your pencil this way. Currently I have this drawing placed flat on the table as it is the most comfortable way for me to draw while writing. But I recommend doing this with your drawing in an upright position so that you can reach your hand out in front of you at eye level.
You can also hold the pencil vertically to check the vertical alignment of different areas in your drawing.
Feel free to switch back to the overhead view
Again, keep your pencil as perfectly vertical as possible, so your measurements are accurate. You can use the edges of your paper as a reference.
In this example, I checked that each eyebrow is aligned with the eye below it. You can see that the left eyebrow extends about 3 mm from the corner of the eye.
But on the right, the eyebrows need to be drawn much wider to fit the other:
Make the appropriate changes to your drawing as you go along, checking and re-checking the horizontal and vertical alignment of the various elements that make up your drawing.
You can measure and compare with the smallest detail if you want to improve your symmetry, precision and visual skills.
Ruler method
You can also do this with a ruler. The ruler edge can be aligned to the edge of your paper for a more accurate position.
A transparency is very useful, allowing you to still see the entire drawing as you move the ruler up and down or right and left.
Paper method
Another option is to use another piece of paper. A large piece will give you the highest level of accuracy because once you align its edge with your sketchbook, you will have a perfect horizontal or vertical line on the drawing.
So far, I’ve only talked about how to fix the problem that happened. To prevent this from happening in the first place, make measurements and compare before drawing the second eye. It is also important to double and triple check your work:
I hope this episode is helpful!
