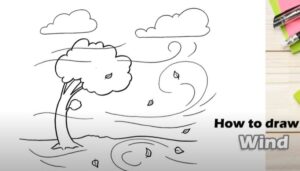
How to Draw the Wind with this how-to video and step-by-step drawing instructions. Easy drawing tutorial for beginners and kids.

Please see the Wind drawing tutorial in the video below
I recommend completing an excellent and very useful drawing lesson for each of you in which I will tell and show you how to draw wind step by step. Here is another engaging drawing lesson dedicated to depicting natural phenomena. This phenomenon is considered one of the most frequent and widespread phenomena on Earth.
Wind is the movement of air in open space. The wind can be warm and light, or it can be strong and cold. Wind helps to purify the air, helps move clouds and clouds, and promotes plant growth by carrying their seeds from one area to another. Too much wind can be destructive.
Despite the fact that the air is transparent, with the help of this tutorial you can learn how to draw wind. You will learn how to draw wind with the help of this drawing lesson you will be able to decorate any of your pictures with images of this natural phenomenon in the future.
Wind drawing Step by Step
Step 1
Start by drawing the ground and trunk. Use a series of curved lines to draw the ground or horizon. Notice how the short lines meet at points to give the ground a grassy texture. Then draw the trunk. Use parallel curves for the vertical and overlapping curves for the roots. Also note, the curve of the trunk – a product of strong winds.
Step 2
Draw branches and elongate the trunk. Use pairs of curves for each branch. Draw a small bunch of leaves at the end of a branch, using curved lines to form an uneven shape.
Step 3
Start drawing the foliage of the tree. Use a series of curved lines to form a cloud-like shape.
Step 4
Complete the crown of the tree. Use curved lines to complete the irregular shape. Then start drawing curves to represent the invisible movement of the wind. Use lines of different lengths. Notice the spiral at the leading edge of a line.
Step 5
Draw clouds in the sky. Use a straight line for the bottom of each cloud, then surround the top with a series of curved lines.
Step 6
Complete clouds. Then draw more lines to represent the wind, with spirals on the leading edge. Lines can cross the tree.
Step 7
Draw more lines to indicate the wind blowing.
Step 8
Draw more windy curves. Notice how they form a circle but don’t connect. Then draw some leaves flying in the wind. For each leaf, draw a curved line for the stem and veins. Then use curved lines that meet at a point to enclose the leaf.
Step 9
Draw more leaves flying in the wind. Again, draw a curved line for the trunk and veins. Then use curved lines that meet at a point to enclose the leaf.
Step 10
Color your windy day. Is the sky blue, or are the clouds stormy? Green leaves in spring or vibrant colors in fall? The choice is yours.
You can see more drawing:


