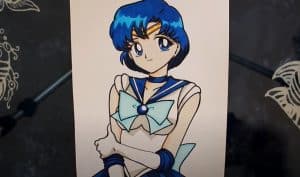
How To Draw Sailor Mercury with this how-to video and step-by-step drawing instructions. Anime Girl Drawing for Beginners and All.

Please see the drawing tutorial in the video below
Kira Dolls Restoration By Carlos Naranjo.
You can refer to the simple step-by-step drawing guide below
Step 1
Create guides for the head and body as we usually do when drawing a shape. Add face guides as well as chi lines.
Step 2
Here you will outline the shape of the face then draw a small bump at the ear.
Step 3
Next draw the parted bangs, then, as you do this, make sure the ends are pointed.
Step 4
Sailor Mercury wears a headband, so you’ll have to draw this headband with the jewel in the middle. When you’re done, you can draw her big eyes, then add a nose, mouth, and earrings.
Step 5
One of the easy tasks when drawing Sailor Mercury is her hair. She doesn’t have long curls instead she has short flowing hair.
Step 6
Now that her hair, face, and features are done, draw the shape of her neck, then draw a V-neck for her top. You will also need to draw a heart shape at the end of the V line.
Step 7
Here now you will draw the shirt collar then draw the bow connecting to the collar.
Step 8
Next, draw sleeves that are looser instead of long. Add definition at the top,
Step 9
Now you can draw her outstretched arm and then draw the loop on the top part of her arm.
Step 10
Draw above her and then outline the shape of her waist. Loosen the dress or mini skirt and then draw the rest of the bows on.
Step 11
Almost done, everyone. Draw the other arm along with the ribbon on the upper part of her arm, i.e. the forearm.
Step 12
All we’re going to do here is draw a definition for her outfit. Add a lined V-belt then draw along the folds.
Step 13
Finally, draw the big bow on the back of her. Erase your mistakes if you make them and then delete those instructions.
Step 14
This is line art. Color in Sailor Mercury from Sailor Moon Crystal. I hope you had fun people.


