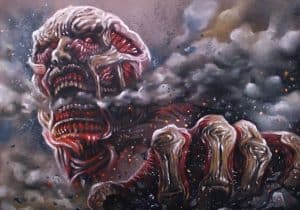
How to draw Colossal Titan from the Attack on Titan with this how-to video and step-by-step drawing instructions. Pencil drawing tutorial for beginners and everyone.

Please see the drawing tutorial in the video below
You can refer to the simple step-by-step drawing guide below
Step 1
As usual, start with a few lines of instructions. Draw the eyebrow line and most of the head as a picture. For the lower face, exaggerate cheekbones, chin and jaw. Draw a little V on the neck muscle first. Then wrap by drawing the rest
Step 2
I like starting with eyebrows, so let’s do it. Notice that the main eyebrow is like an S shape on its edge. The more you exaggerate that shape, the more angry the character will be. The forehead wrinkles make him look angry and angry
Step 3
The nose is quite basic. This guy has very little skin on his body, so his nose and ears are the main remaining features to make him look like a human being. The wrinkles around the nostrils add to the angry expression.
Step 4
You want to draw small eyes about this guy. Almost too small. Keep them squinted a little.
Step 5
Next we will draw the outline of the head and the open shapes of the skull around the eyes and on the side of the head.
Step 6
Strangely, this guy still has lips, even with the majority of his skin missing. The exaggerated opening expression here will allow us to truly show our teeth later. Give him a big lower lip, because there’s nothing but muscles below it.
Step 7
Here we will draw the chin, jaw and ears. We can also begin to paint some skin around the face and hook under the jaw, near the corner of the mouth.
Step 8
The main point here is the open shape on the cheek area. After drawing, we can go in and start adding details to the head and face. Wrap some wrinkles around the head to show the shape of cranium. Draw cracks on leather ribbons and
Step 9
Now we can start adding teeth. Normal human teeth do not look like this. The characters in Attack on Titan are extremely stylized. Although some details are anatomically inaccurate, they look great and add to the uniqueness of the designs. Begin
Step 10
Now he really starts to look familiar. Drop in the lower teeth. Draw some vertical lines on the lower lip, and add some tight skin underneath the lips. That is where the skin will end. Locate the upper lip a little more and add shadow under the nose
Step 11
Next, draw the muscles on the chin and the head. We can add some details for the ear ribbon and skin.
Step 12
Here we go. If you’ve never painted your gums before, look in the mirror or just feel around your teeth and gums with your tongue so you can get a mental picture of what you need to draw. These gums are exaggerated and stylized, but ar base shape ar
Step 13
Here we will go back and strengthen the ball with small dashed lines.
Step 14
With the head completed, I will accelerate through my neck and torso. For a more detailed look at how to draw a muscular human body, see my tutorial on How to draw muscles. Here I have outlined all the major muscle shapes.
Step 15
Although it is not necessary to draw many of these details on the muscles … but it is just like that in the drawing. At this stage, I’m mainly concerned with having the shadow in the shallows of the neck. Left, trapezoid
Step 16
You can see I got a lot heavier on the shadow under my jaw and chin. There are dotted lines on the upper and lower ends that are very close together, giving the muscles a shiny, reflective appearance. Block in larger muscle sections with thick curves
Step 17
Use thick shadow areas to indicate the overall shape of each muscle part. Open areas with thinner lines are getting more light than the concave sections at either end of the muscle. Here is an example of how it talks more about wha
Step 18
The shoulders are closer to us than the rest of the body, and the upper arms are even closer to us in this picture. Therefore, the lines of muscle fibers will get thicker as they get closer to us, and the open spaces will also be slightly larger. Passing through t
Step 19
This is the final ink illustration. I did this digitally, based on the pencil sketch I scanned. You can use a drawing tablet on the computer. However, if you are doing this on paper, all that muscle is a great time to use a brush with Indian black ink. You will want a hair brush, or something close to it. I recommend using Bristol paper if you are going to use liquid ink. Thin paper will wrinkle and lock, so if you can get Bristol, it’s always good to have it on hand. You can use technology pens like Sakura Pigma Microns for smaller details of the face and for more smooth shading. That’s okay Thanks for watching this tutorial!


