How to draw Broly super saiyan easy with this how-to video and step-by-step drawing instructions. Cartoon drawing tutorials for beginners and kids.
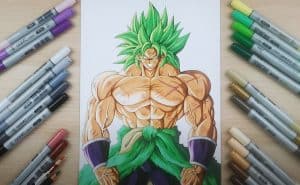
Please see the drawing tutorial in the video below
You can refer to the simple step-by-step drawing guide below
Step 1
Like other characters in the Dragonball series, Broly has a pretty detailed design.
This portrayal of the character also has him in his transformed state, and this means that he is extremely muscular.
These aspects can make it difficult to entice him, but we will go slowly throughout this guide!
Now, we’ll start with his face and a bit of his hair. As for his face, you might want to zoom in and get close to our example image to get a better look at the details you want to paint his facial features.
Then we’ll use some curves to create some thin shapes with sharp points at the ends for our hair.
Once you’ve drawn these parts as they appear in our reference image, we can then move on to step 2!
Step 2 – Now draw more of his hair and body
Many of the characters in this series have distinctive spiky hairdos, and this is especially the case when they perform Super Saiyan transformations.
That’s the case in this image, so we’ll make his hair even bigger in this second step of your Broly drawing.
To do this, add some of the slim, pointed shapes you started with in the previous step to make his hairstyle bigger.
Then we will start drawing his shoulders and chest. He has goofy muscles in this image to accentuate his dramatic transformation, and for that reason you’ll draw some big, round shapes for his various muscles.
Once you’ve recreated his shoulders and chest as they appear in the reference image, you’ll be ready for step 3.
Step 3 – Next, draw more of his arms and waist
Continuing with this step of the Broly drawing tutorial, we will draw more of his arms. He will raise his fist slightly for a powerful pose in this photo.
To draw his arms, just continue drawing more of the circular muscles you started with for his shoulders and chest. Then we’ll also draw his abs to finish off this step.
Step 4 – Draw his pants
The next step of this Broly drawing can actually prove to be one of the more complicated steps in the tutorial.
We’ll draw his pants and if you’re wondering why that’s so difficult, check out our example images! His pants are made up of lots of layers of fabric with lots of pleats on them.
Although it looks scary, as long as you follow the example image closely you shouldn’t have any difficulty!
First, use some curves to create the belt he’s wearing. Then you can start drawing layers of his pants.
Try to focus on layers one at a time as you draw, and you’ll find it much easier to get it right.
We can then finish off his legs and feet in the next step, so when you’re ready we can move on!
Step 5 – Add Final Strokes to Your Broly Drawing
Now that you’ve completed one of the more complicated steps in this Broly drawing tutorial, you can move on to this easier step where you’ll be drawing his boots.
Unlike pants that are made up of several layers, boots are drawn with a number of small sections. Use some more rounded lines to draw his bulky boots, and then you’re done and ready for the final step!
Before taking that last step, you can also add to this drawing. It can be fun to paint a background to represent your favorite scene or moment that Broly was in. How would you like to complete this drawing?
Step 6 – Finish Your Broly Drawing With Some Color
This is the final step in your Broly drawing process, and now you can go ahead and color him! In our reference image, we kept him looking correct with the show by using some red and yellow for his clothes.
He is depicted in Super Saiyan form here, so we also used some light blonde to his hair to reflect this.
You can go ahead and use this palette for your own drawings to maintain accuracy, but you can also change the colors and shades of your choice!
We can’t wait to see what colors and artistic mediums you used to complete this Broly drawing!
Your Broly drawing is done!
This is quite a difficult drawing to make, so you should be really proud of the fact that you finished this Broly how-to tutorial!
Although this is a detailed drawing, we really hope that it has made it much easier for you to follow.
As long as you carefully follow all our steps you will master this drawing in no time!
If you enjoyed this drawing tutorial, you can visit our website for more great drawing tutorials like this one.
We have more products coming soon that you don’t want to miss, so stay tuned!
No Responses