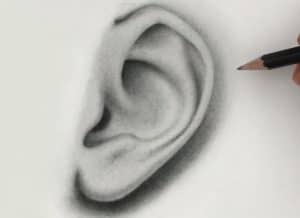
How to draw an Ear from the front easy with this how-to video and step-by-step drawing instructions. Easy drawing tutorial for beginners and all.
Please see the drawing tutorial in the video below
You can refer to the simple step-by-step drawing guide below
Step 1
Draw an ear shape Using the blunt HB pencil, draw a narrow ear shape. If you want to draw your ears protruding more from your head, draw your ears wider. Then, measure the length of your drawing and make a ruler next to it. Draw 3 lines through the ruler, break them into 4 equal segments. I am labeling 3 lines A, B and C so that I can easily refer to them.
Step 2
Draw a big hook Draw a hook shape starting at line B and ending at line A.
Step 3
Adding an earlobe In a continuous stroke starting from line B, draw a turban (the small flap in front of the ear canal) and finish your stroke with a small hook located above line C.
Step 4
Make a big crease Add a curve on the far right starting at the top of the ear and ending below the C line. Leave a fair amount of space for the earlobes.
Step 5
Add a small hook. Between the two lines you just drew, draw a large hook on line C. This is the anti-tragus part.
Step 6
Use the shading technique to draw a curved line in the middle of the ear. Try not to make it parallel to the curve drawn in step 4.
Step 7
Prepare for shade Okay, last one before we shade! Erase the ruler and horizontal lines. To keep your edges sharp and clean as you shade, use a sharp 4B pencil to outline the areas of the ear where the shadows are darkest – Areas like deep valleys, large folds and protrude. Your contours should not be too dark because you don’t want them to show after shading.
Step 8
Adding the Darkest Shadows If your pencil is still sharp, use a piece of scratch paper to make it blunt and then draw your shadows.
Step 9
Adding a Layer of Light Graphite Use a blunt HB pencil to paint an even layer of graphite over the entire ear. If you want bright white highlights, don’t cast shadows on them.
Step 10
Adding Mids Use the 2B Pencil to add your mids. Shade areas such as ear holes, shallow recesses and slight folds.
Step 11
Blend Graphite Use a blend stump to smooth your shadow. If your highlights are too dark, roll your kneaded eraser into a small end and dab some graphite away.
If your edges are blurred, use a sharp pencil to redefine your edges and blend them lightly if needed. I’ve received several requests for the left ear, so here are the steps for those of you struggling with the other side: Did you like this tutorial? Share it with your friends using the buttons below 🙂


