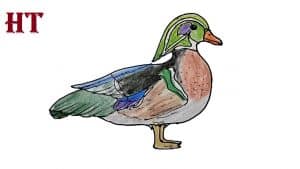
How to Draw a Wood Duck easy with this how-to video and step-by-step drawing instructions. How to draw animals for beginners and everyone.

Please see the drawing tutorial in the video below
You can refer to the simple step-by-step drawing guide below
Step 1
To start drawing your Wood Duck, you’ll want to draw the duck’s head. To draw its head, start with a curved line and add the front and back features shown above using straight lines.
Step 2
Next, you’ll want to draw Wood Duck’s face. Draw a circle for the eye and draw a curved line to cut out of the beak.
Step 3
Now you will need to draw the pattern on the head and neck. Using curved and straight lines create the pattern as shown above.
Step 4
The next step is to draw the body. Draw the front of the body by drawing a circle going from the front of the head down and around the bottom. For the back, draw an angled line coming out from the back of the head.
Step 5
Now draw the top of the wing using straight lines to create a rectangle on the top of the back.
Step 6
Next draw the lower part of the wing. Use curved lines together at the attachment points to the lower part of the wing.
Step 7
For the next step, draw the upper tail covers. Draw a four-step pattern of rectangles to create the cover plates.
Step 8
Now you will need to draw the tail. To create the tail, draw two curved lines away from the back body.
Step 9
The next step is to draw the legs. Create the foot with a triangle with three points and attach two lines for the legs.
Step 10
Draw the other leg similar to the first leg behind it.
Step 11
Finally, you will want to draw the model of the body. Use straight lines that connect at points on the chest to create the top pattern. You have now drawn a Wooden Duck.


No Responses