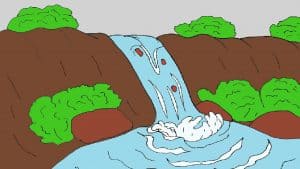
How to Draw a Waterfall Easy with this how-to video and step-by-step drawing instructions. Easy drawing tutorial for beginners and kids.

Please see the drawing tutorial in the video below
You can refer to the simple step-by-step drawing guide below
Step 1
Start by drawing a long, curved line like an inverted letter “L.” This line forms one of the rock faces from which your waterfall flows.
Step 2
Draw a short, curve extending from the top of the rock face. Then, from this line, draw a long and curved line. You just outlined the water flowing through your waterfall.
Step 3
Add detail and texture of the water flowing into the waterfall. Draw long and short curves of different sizes along the length of the waterfall. At the bottom of the waterfall, draw some wavy, circular lines. These lines represent the turbulence that occurs when fast-flowing water meets rocks at the bottom of the falls.
Step 4
Draw some rocks at the bottom of the waterfall. For each rock, use a curve around an irregular shape.
Step 5
Delete instruction lines if necessary.
Step 6
The maple tree grows in wet areas at the bottom of the waterfall. Draw them! First, use a series of small, connected “U”-shaped lines to outline the shrub. Notice that the outline of the shrub is not only round, but also wavy and wavy. Then vignetting the bush by drawing a series of curved, connected “U”-shaped lines inside it.
Step 7
Draw the rock surface on the opposite side of the waterfall using several long, connected curves.
Step 8
Draw more water jets and ripples at the bottom of the waterfall. Draw a wavy line to represent the turbulence at the bottom, and draw more wavy lines around the circles drawn in the previous steps. Surrounded by a number of water droplets, representing water splashes from the falls.
Step 9
Add the final details to your landscape. Draw a long curve at the top of the waterfall and add drop shapes along the length of the waterfall. Draw rippling, jagged lines along the rock surface to create a coarse texture.
Step 10
Color your waterfall.


