How To Draw A Trash Can easy with this how-to video and step-by-step drawing instructions. Easy drawing tutorial for beginners and kids.
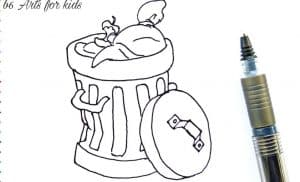
Please see the drawing tutorial in the video below
You can refer to the simple step-by-step drawing guide below
Step 1
In this how to draw a trash can tutorial, we will draw a trash can that overflows with a book and looks a little rough!
It wouldn’t be a pretty scene in real life, but it would help make it a more interesting drawing.
This trash can is spilling some indescribable liquid on the ground below it, and this is what we’ll start with in this opening step.
Drawing this liquid spill is pretty simple to do, and all you need to do is draw a wavy line to show how it lumps on the ground.
Once you are satisfied with how it looks like our reference image, we can move on to the second step!
Step 2 – Next, draw the beginning of the outline for the trash can and lid
For this second part of your trash drawing, we’ll start out sketching for the trash can itself.
Before that, you could first draw the lid of the trash can against it, and you can do this by drawing a thin circle with a small space on the left hand side.
Then draw another curve for the rim of this cap, as shown in the reference figure. We’ll finish the lid in a later step, but for now we’ll draw the bottom of the trash can.
To draw the base, simply draw two more curved lines running parallel to each other to contour the base. This outline will be the same as the one you drew on the lid.
Step 3 – Continue drawing more trash cans
Now that you have drawn the base and outline for the lid, we can start sketching the trash can itself in this step of the how to draw a trash can tutorial.
For the right side of the trash can, draw a slightly raised line from the edge of the base.
Then for the left side you can extend a line from the top of the cap. You can connect these sides of the trash can using a horizontal curve for the top of the trash can.
Finally for this step we will draw a large handle and some line details on the lid to complete it.
Step 4 – Now draw the outline and details of the trash can
For the fourth step of your trash can drawing, we’ll add a border to the bin along with some details on the side.
For the rim, we’ll use a similar look to the rim you drew on the base and lid of the trash can.
However, this rim will be wider and more open, and we will fill in the large gap above the rim in the next step.
Step 5 – Add some trash to complete this trash can drawing
Before you start coloring your picture, we’ll add some trash to the opening you’ve drawn.
We have added all kinds of rotting foods inside the trash like fish skeletons, apple cores and other rotting foods.
You can recreate the trash can we drew, but this will also be a good opportunity for you to have some fun creating some disgusting trash of your own!
You can even add more trash than we do to actually have it overflow.
You can then finish it off with a background image to show the location of this raw trash can to complete this step of our how to draw a trash can tutorial.
Step 6 – Finish your trash can drawing with some colors
This is the final part of your trash can drawing, and in this section we’ll finish off by adding some color.
We’ve kept the colors more muted in this example image, and this helps to make the trash look a little more dirty and dingy.
We used a combination of light and dark gray for the metal of the trash can, and then for the bin itself, we used more dark colors.
Finally, we made this trash can look a little rougher by making the puddle underneath it dark green.
These are just some of the colors you can use for this drawing, but they’re not the only choices!
You should feel free to use any of your own color choices, and then you can decide on the artistic mediums you will use to achieve these colors. This is a great opportunity to get creative with it, so be sure to have fun!
Your Trash Drawing is done!
We mentioned earlier in this tutorial how to draw a trash can which we described is not the scene you want to see in real life!
Even so, it certainly makes for a fun subject to draw on and we hope that these steps make it fun and easy for you.
There are a few spots in this tutorial where you can add some of your own flourishes and accents, so we’ll look forward to seeing your creative additions!
This guide is one of many that we have available for you to enjoy on our website! We hope to see you there often, as we have many guides coming regularly.
Don’t forget we’d love to see your finished trash can, so be sure to share your work on our Facebook and Pinterest pages!

