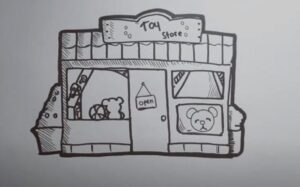
How to draw a Toy Store with this how-to video and step-by-step drawing instructions. Easy drawing tutorial for beginners and all.

Please see Toy Store drawing tutorial in the video below
Toy Store Drawing Step by Step
Step 1. First draw the building
First, draw a thin rectangular strip to form the roof. Next, form the walls of the toy store by drawing a rectangle.
Step 2. Add doors and windows
Now, draw the rectangular outlines of the doors and windows. Add a small rectangular window above the door. Then, draw horizontal strips on the window to form the stand.
Step 3. Sketch the Word Toy Store
Sketch the words “TOY STORE” above the roof of the store.
Step 4. Draw a variety of shadows
Let’s add some balls on display as shown.
Step 5. Add a toy car
Add a toy car on display by first drawing two round wheels. Then, form the outline of the car.
Step 6. Create a teddy bear shape
First, draw the teddy bear’s head by creating a circle with two curved lines attached. Next, shape the teddy bear’s body by drawing a circle connected to the bottom of the head. Then add the arms and legs by drawing circles connecting its body.
Step 7. Draw the teddy bear’s face
Draw the teddy bear’s face by creating two dots for the eyes, another dot for the nose, and two curved lines for the mouth.
Step 8. Add a boat
Start by creating the curved shape of the boat’s hull. Then, attach the boat’s triangular sail.
Step 9. Complete the toy store drawing
Let’s color our toy store drawing! First, use a yellow pencil to color in the roof as well as the door and window frames. Next, fill in the glass on the doors and windows with a light blue pencil. Now, color the door with a brown pencil. After that, paint the wall with a red pencil. Finally, color the text on the toy store using blue, green, and orange crayons.


