How to Draw A Tiger Head easy with this how-to video and step-by-step drawing instructions. Easy animals to draw for beginners and everyone.

Please see the drawing tutorial in the video below
You can refer to the simple step-by-step drawing guide below
Step 1
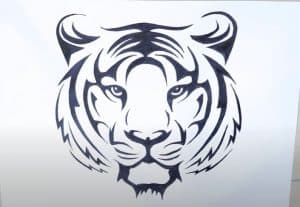
For the first step of the tutorial on how to draw a tiger, we will start with the first ear and one side of the head.
To start with the ear, you can draw it with a pointed curve to suggest that the ear is quite hairy. Then there will be another strong curve inside the ear for more detail.
Finally, you’ll use a combination of curves and sharper lines to create the top of the head along with some stripes.
It may seem complicated, but if you follow the instructions and do it slowly you should have no problem!
Step 2 – Create a mirror image for the other side of the head
The second part of your tiger drawing should be a simple one for you to do, as you are simply mirroring everything you did in the previous step.
Using your own reference images and drawings, you can do your best to make this right end exactly the same way the other side did.
Step 3 – Now, continue with the rest of the face
With the top of the tiger’s head drawn, you can now start drawing the lower part of the face.
There is a lot of intricate detail to this part of the face, so for this part of our how to draw a tiger tutorial you can take a similar approach as the previous step.
You can start with one face and then mirror it to create that symmetry. Don’t forget to add the tiger’s scary eyes in this step!
Step 4 – Next, draw the edges of the tiger’s head
The previous few steps of how to draw this tiger were quite complicated, so let’s come back a bit for this one!
For this step, you will use some jagged lines on either side of the face to create sections of hair on the sides of the head. That’s all there is to this step and you’re ready to go!
Step 5 – Now you can draw the nose and muzzle
This step of our tutorial on how to draw a tiger is also a bit simpler than the first steps.
You can use some curves for the thin nose of the tiger, and then use some small serrations for the details on the muzzle.
Step 6 – Draw the beard for the tiger
We have another simpler step for your tiger drawing in this next section. This step will be just adding some whiskers to the tiger’s snout.
You can do this by extending some simple, curved lines from the lines in the muzzle. Once you’ve done these, we just need to add some more details before you color your picture.
Step 7 – Draw the final details
It’s almost time to start adding some amazing colors in this tiger tutorial, but first, we have some final details and elements to add.
First, you can draw the lower part of the face using some more jagged lines to form the furry base of the tiger’s face. Then you can perfect it by adding some small details inside the tiger’s ears.
That will do for the details in this tutorial, but this is your drawing and you can go further with your own details if you want!
You can paint the background, add the body of the tiger, or add any other stylistic elements you might want to it.
What can you think to complete this amazing drawing of yourself?
Step 8 – Finish your tiger drawing with some colors
Tigers are famous for their beautiful color schemes, and you can recreate this color scheme in this part of your tiger drawing!
As you know, tigers are mainly bright orange, black and white, and this is the color palette we used in the reference image. Even if you prefer these more realistic colors, there are plenty of ways you can add a little variety.
You can use different tones and shades of these to create some color textures, and you can also experiment with different art mediums depending on the style you want.
We can’t wait to see how you use color and your art tools to bring this image to life!


