How to Draw a Taco easy with this how-to video and step-by-step drawing instructions. Learn to draw for beginners and kids.

Please see the drawing tutorial in the video below
You can refer to the simple step-by-step drawing guide below
Step 1
Start by drawing a full downward curved line that looks like the top half of a circle. This forms the front part of the taco shell.
As you can see in the illustration, the curve is slightly off-centre because it is tilted slightly to the right.
Don’t worry because this is how it really should be! This ensures that there is enough space for the taco shell in the back as well as the filling inside.
Step 2 – Create Taco Crust
Starting at the right end of the curve, draw a horizontal line at the bottom around the shape of the taco shell.
Then bring the line upwards to form another curve until it touches the first curve we drew earlier. This creates the back shell, thus completing the form of the taco shell.
Then draw an upward curve from the left end of the curve that we drew in the previous step. This creates a split between the back and the front taco shell.
Step 3 – Add the filling to the Taco
Draw a wavy line inside the taco shell. Remember that this line should be between the back and the front taco shell.
This creates the edges of the lettuce.
Step 4 – Add Ground Meat on Tacos
Draw a shorter wavy line right next to the tacos. This creates the appearance of a ground meat filling.
It can be chicken, pork, or beef — or it can be tofu if you’re vegan! Remember that the sky is the limit for your imagination! You can turn it into anything you want.
Step 5 – Add a bunch of grated cheese
You can never have too much cheese in a taco! In fact, cheese is one of the main ingredients of tacos.
A good tacos wouldn’t be complete without lots of cheese, especially if they’re already melted and melted! Very delicious!
So in this step we will add more cheese! Simply draw a scalloped line that forms a curved line right next to the last fill that we drew in the previous step. This creates the appearance of cheese inside the taco shell!
Step 6 – Add a slice of sliced tomato
Draw a small curved shape right next to the cheese.
This forms a tomato slice. You can add as many or as few tomato slices as you like!
Step 7 – Add a slice of sliced cucumber
Draw another small curved shape above the tomato. This creates a cucumber slice.
Step 8 – Then Add Lettuce
Now complete the filling of the tacos by drawing another wavy line. This creates the final layer of lettuce.
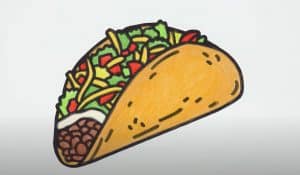
As you can see in the illustration, we have kept the filling of the tacos simple. It has some tomato, cucumber, green leafy vegetables and ground meat.
Feel free to add customizations on the taco. You can add sauce or more filling if you like! It’s all up to you — after all, it’s your taco and your artwork!
Step 9 – Draw the patterns of the shell
Taco shells often have distinct circular patterns all over its surface, so that’s exactly what we’ll be painting in this step.
Draw circles of different sizes on the surface of the taco shell. This adds texture on the taco shell, making it look more realistic!
As you can see in the illustration, the tacos have finally come together and look delicious! Now all that’s missing is a bunch of colors to make it colorful!
Now that we’ve successfully drawn a taco, it’s finally time for the most fun part. In this step we will color the tacos!
Traditionally, taco shells are cream or golden yellow. However, today it comes in a variety of vibrant colors such as green, red and purple.
This gives you a ton of color options to choose from when coloring taco shells.
As for the filling of banh tet, we all know that the lettuce is green, the meat is brown, the cheese is light yellow, the cucumbers are light green, and the tomatoes are red.
You can choose to color the taco shell and its filling with their original colors or use a unique set of colors. Either way, we’re sure the color we’ll create is perfect!


