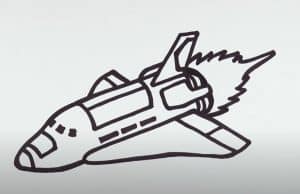
How to draw a Space Shuttle easy with this how-to video and step-by-step drawing instructions. Easy drawing tutorial for beginners and kids.

Please see the drawing tutorial in the video below
You can refer to the simple step-by-step drawing guide below
Step 1
This drawing lesson will be quite simple, and we will start with the most basic details. So, first of all, we outline the outer contours of the shuttle’s hull, like a bullet. Traditionally, the first steps should be done using very light lines.
Step 2
To make our drawing more like a shuttle, we sketched the most basic details of the body. First, we outline the contours of the windows. Next, draw the outline of our shuttle’s wings and tail.
Step 3
Starting from this step we have to be more careful, as we will get involved in the final drawing of the space shuttle parts. Here, we carefully draw the contours of the body and the window, using clear and dark lines.
Step 4
In the previous step we drew the front part of the diamond, in this step we will draw the next part. Also, with the help of clear and dark lines, carefully draw the contours of the tail and remove all the unnecessary guide lines from the back of the shuttle drawing.
Step 5
This will probably be the simplest step by step tutorial on how to draw a shuttle. Here, using clear and dark lines, carefully draw the wings of the shuttle. At the end of the step remove all unnecessary guides from the drawing and proceed with shading.
Step 6
Now let’s make our drawing of the space shuttle more massive and three-dimensional. We first identified the light source, then added shadows to areas of the space shuttle where the light was not shining.
We love the space and everything related to it. We have drawn an astronaut and many different characters from movies and books related to the subject of space. Please suggest future drawing lessons ideas in the comments for this article or in our social media pages.


This step-by-step guide was super helpful! I’ve always struggled with drawing the Space Shuttle, but your clear instructions made it so much easier. I can’t wait to try it out with my kids! Thank you for sharing!
Great tutorial! I loved the step-by-step approach; it made it so much easier to follow along. Can’t wait to try drawing my own space shuttle!
This step-by-step guide is fantastic! I never thought I could draw a Space Shuttle, but your instructions made it so easy to follow. I can’t wait to show my kids what I’ve created. Thanks for sharing!
Great tutorial! The step-by-step instructions were easy to follow, and I loved the tips on shading. Can’t wait to try drawing my own space shuttle!
This step-by-step guide on drawing a Space Shuttle is fantastic! I love how you broke down each part, making it easy for beginners like me to follow along. Can’t wait to try it out!
This step-by-step guide is so helpful! I never thought I could draw a space shuttle, but your clear instructions made it easy to follow. Can’t wait to try it out and share my drawing! Thank you!