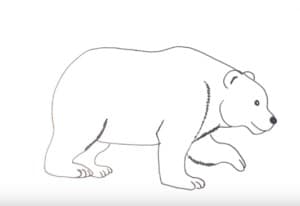
How to draw a polar bear easy step by step with this how-to video and step-by-step drawing instructions. Easy animals to draw step by step for children.

Please see the drawing tutorial in the video below
(Video by the channel)
You can refer to the simple step-by-step drawing guide below
Step 1
Start by drawing a “C” for the bear head.
Step 2
At the bottom end of the letter “C” draw a short curve for the muzzle and on the outer edge of the letter “C” add a small round ear. At the top of the “C” add a small round ear. Resume that line.
Step 3
Inside the small snout is a round nose and a straight line for the mouth. Right on the nose two small eyes. There is a curve inside the right ear. From the head of the head draw a line with a light bump up. Continue the line from the bottom of the head to make the neck.
Step 4
Bend the top line down and back up to create the following line. Be sure to bend it down at the buttocks.
Step 5
At the end of the neckline begins to draw a thick, slightly diagonal line. Continue down the line into a long flat leg. Bend the back of the front leg up to the same height as you started.
Step 6
Continue abdominal tract at an angle down. Add the hind legs first. It will be the same size as the front leg with another big flat foot. The back of the hind legs will lean toward the rump.
Step 7
Finish by adding another leg directly below the head and front leg. Add a simple curve to make the second leg behind. Join this line on the buttocks. And the color of the polar bear is white.


