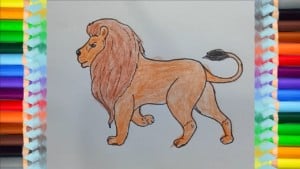
How To Draw a Lion step by step for kids with this how-to video and step-by-step drawing instructions. Easy animals to draw for children and everyone.

Please see the drawing tutorial in the video below
You can refer to the simple step-by-step drawing guide below
Step 1
First draw the snout. Make three humps of equal size for nose and mouth. The top of the muzzle will be a little longer than the bottom.
Step 2
Next draw small eyes near the top line of the muzzle. Draw the top of the mane with a curve from the top of the muzzle back. Draw the lower part of the mane from the bottom of the mouth. Join two lines with rough or bumpy lines.
Step 3
Draw a triangular shape in the mane. It does not go out the front line. Add the scribble to the feather.
Step 4
Draw a long straight line to be proud of again. It will bend down just a little at the butt.
Step 5
Just beneath the mane, draw a short line to make the front of the front leg. Draw the foot and carry the line up to about half the mane. From this line draw curved lines back to the front line for the hind legs. The hind legs are wider at the top. The hind legs are angular out of the body. Join the back line of the foot with the butt.
Step 6
Add another leg immediately where the back end of the first leg ends. The leg was bent back like a lion was walking. Add another hind leg in front of the hind leg. Finish by drawing a long thin tail with a feather at the end.
Step 7
Finally finish the lion with color.


I see you don’t monetize your website, don’t waste your traffic, you can earn additional cash every month.
You can use the best adsense alternative for any type of
website (they approve all websites), for more details simply search in gooogle:
boorfe’s tips monetize your website