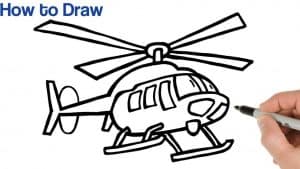
How to Draw A Helicopter easy with this how-to video and step-by-step drawing instructions. Simple drawing for kids and beginners.

Please see the drawing tutorial in the video below
You can refer to the simple step-by-step drawing guide below
Step 1
We’ll start with the fuselage of the helicopter in this first step of the how to draw helicopter tutorial.
To do this, you can draw a rounded oval to form the outline of the helicopter’s fuselage. Once you have that outline, you can add a window on the cockpit.
This will go on the left side of the helicopter’s fuselage.
Once you have the outline and window looking like in our reference image, you’re ready to move on to the next step!
Step 2 – Draw the tail for your helicopter
You already have the main outline of your helicopter drawing, so we’ll start building the other components over the next few steps.
Now we will add a tail to your helicopter. To do this, you can use a ruler to draw two lines from the back of the helicopter.
They should be angled in such a way that they get closer together as they go further. You can then use some more vertical lines to create the end of the tail.
Before continuing, you can add a rectangle to the top of the helicopter. Then you can add a small round section on top of it.
This will be the part of the helicopter called the drive shaft, and the propellers will soon be fitted into it.
Step 3 – Now draw some propellers and landing slides
Without propellers, a helicopter would be an expensive lawn ornament and little else! We don’t want that for you, so let’s add some propellers in this step of our how to draw a helicopter tutorial.
The rotors will go on top of the drive shaft we mentioned earlier. They are pretty simple to draw, and you can use some straight but slightly rounded lines to draw them.
Before we continue, we’ll add more stuff to the bottom of the helicopter. These structures are called landing slides, and as you can guess from the name they are used to assist in landing.
You can use your ruler to draw some diagonal lines going down from the helicopter. You can then draw some horizontal lines to create the bottom of the landing slide.
This sounds more complicated than it is, and if you refer to the reference image you should have no problem!
Step 4 – Add some window details
We will elaborate the details of your helicopter drawing in this step. For this step, you can use some lines to extend the cockpit’s window a little further back.
You can then draw a small rectangle inside this extended area as you can see in the reference image.
Step 5 – Now you can add the final details of your helicopter drawing
Before we move on to the coloring phase of this helicopter tutorial, we first have some final details to add.
These are mostly pretty subtle, but they will go a long way in making your helicopter look better!
You can add some small lines throughout the helicopter to give it a little more texture, as shown in our reference image.
You can then draw another small window behind the cockpit window, and then add a rectangle below it.
These are the details we added to our example, but feel free to add any of your own!
Maybe you could draw someone in the cockpit or draw some clouds behind the helicopter. What details can you think of to add to your helicopter drawing?
Step 6 – Finish your helicopter drawing with some colors
Now that you’ve finished your helicopter painting, you can finish it off with some awesome colors!
We used a range of shades of blue for our example, but you should use whatever color you love, as helicopters can come in any number of different colors.
You can also see in the reference image that you can use color to give the illusion of spinning propellers.
To do this you can simply create a gray oval around the propellers with some white lines coming out from the center. This simple trick is very effective in giving the propeller a sense of movement!
If I were coloring this, I would use some crayons and markers to make the colors pop!
There are different art mediums you can use depending on whether you want the image to be brighter or dimmer. How would you complete this drawing with your colors and art tools?


