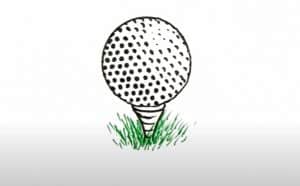
How to Draw A Golf Ball easy with this how-to video and step-by-step drawing instructions. Simple drawing for kids and everyone.

Please see the drawing tutorial in the video below
You can refer to the simple step-by-step drawing guide below
Step 1
For the first step of our tutorial on how to draw a golf ball, we will use a pencil to draw some rough outlines to make it easier for you to draw.
Using your pencil, start by drawing a circle in the center of the page.
You can use a tool like a drawing compass to help you with this if you have trouble drawing freely.
Then you can draw some lines coming out from the bottom for the tee. Once drawn, you can add some lines around the tee for the grass.
When you’re satisfied with how it looks, you can use the pen to glide over the round ball.
Step 2 – Next, start drawing small dents on the golf ball
The golf ball is covered with a lot of small indentations called indentations, and we will draw these indentations for this part of your golf ball drawing.
To do this, use your pen to start drawing some dots on balls of various sizes. For now, we’ll only do the left side of the ball.
Step 3 – Now, continue to draw more dimples on the ball
In our tutorial on how to draw a golf ball, we’ll add some more dimples that you started with in the previous step.
Just keep adding more dots extending to the center of the ball like you did in the previous step.
Step 4 – Next, draw final indentations for the golf ball
Finally, you can complete the indentations in this part of your golf ball drawing. These will fill the rest of the ball, but there will be an empty spot near the top right of the ball.
That will complete the indentations on the ball, so we can focus on more elements for the next few steps.
Step 5 – Now you can draw some details for the tee
We’re done hitting the ball now, so in the next step of our tutorial on how to draw a golf ball, we’ll add some details about the teeing ground.
To do this, simply go over the pencil lines for the tee that extends down from the bottom of the golf ball.
Step 6 – Next, draw some grass details in this section
Now that you’ve drawn the ball and tee, you can start adding some grass to your golf ball drawing in this step.
To do this, all you need to do is draw some sharp lines around the base of the tee as you can see in the reference image.
Once you’ve drawn these first grass blades, you’re ready for some final details in the next step!
Step 7 – Next, draw the final details of your golf ball drawing
In this part of our tutorial on how to draw a golf ball, we’ll add some final details before you start coloring your picture.
First, you can finish by drawing more leaves around the tee. You can add more or less if you like to your image.
Once you’ve drawn all these details, you can then erase the pencil lines from the first step if you haven’t drawn yet.
Before continuing, you can also add any details of your own that you like! Some examples are drawing the end of a golf club next to the ball or a background to indicate where the game is being played!
What can you think to complete this drawing of your golf ball?
Step 8 – Now finish your golf ball drawing with some color
The final step of this golf ball drawing is to add some nice color to your picture! In our example, we used green for the grass and some shade of gray for the ball.
However, this is just one way you can color this image and you should feel free to get creative with it and add any details of your own!
A golf ball can come in all different colors, so feel free to choose your color scheme.
Once you know what color you like, you can also have fun choosing some art media and tools to use to make it come true.
Acrylic paints, crayons, or markers can help create vibrant, colorful images, while some watercolors, crayons, or crayons work to create a softer, more blurred image.
What colors and mediums will you use to bring your golf ball to life?


