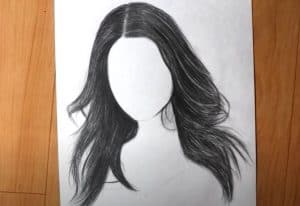
How to Draw a Girl Hair by Pencil with this how-to video and step-by-step drawing instructions. Easy drawing tutorial for beginners and everyone.

Please see the drawing tutorial in the video below
What you’ll need:
– HB (#2) Pencil, 4B pencil
– Eraser
– Drawing paper
– Drawing surface
You can refer to the simple step-by-step drawing guide below
Step 1
To start, lightly draw the outline of the head and the basic shape of the hair. Now, take some time to think about how the hair falls out on the person’s head, shoulders, clothing, and surroundings. For the sake of simplicity, I have chosen a very general pose for this exercise.
Step 2
Next, locate the shadow on the hair. Visualize where the light source is and how it falls on the subject’s hair. Again, work very gently in the contours. This step just provides the background to create highlights and shadows in the character’s hair.
Step 3
Tip: Working on a small section of hair at a time will yield more even results, especially when working on a large drawing.
Step 4
Okay! Now that we have the outline and a marker where the shadows will be, we can move on to adding more details. Start gently at first until you can feel how much you need to move your hand/wrist.
Step 5
This is where many people will start making mistakes. DO NOT draw EVERY strand of hair, doing so will create very flat looking hair. Instead, we just draw the shadow of the hair. Highlight will be generated when there is no line.
Step 6
Use flowing lines and draw in the shadows a bit more now. Remember that the darker your shadow, the darker the hair. Spread the shadow as far as you think to achieve the desired effect. The more abrupt the transition from dark to light, the shinier the hair will be. Smooth transitions from low light to highlight color will result in duller looking hair.
And that’s it! You finished it! And as always, if you don’t get the results you want the first time around, don’t be discouraged. They say that practice makes perfect…


