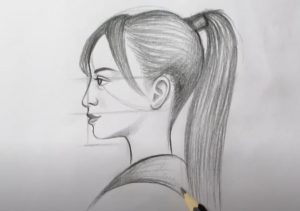
How to draw a Girl face (side view) easy with this how-to video and step-by-step drawing instructions. Pencil drawing tutorials for beginners and All.

Please see the drawing tutorial in the video below
You can refer to the simple step-by-step drawing guide below
Step 1
Draw an oval Draw an oval and a line at the bottom. The line should be slightly more than half of the oval’s longitudinal diameter. In other words, a little more than the vertical radius of the oval.
Step 2
Face contour Connect the oval with the horizontal line to complete the shape of the head. Then, draw a long line down the center of the oval. Don’t worry about shaping your jaw or chin. These are preliminary instructions only!
Step 3
Make a Ruler Use the length of the head to make a ruler next to your drawing. Don’t draw too close to the face because you want to create space for the nose. Divide your ruler into 8 equal spaces and use a straight edge to draw lines from each tick over the top. Don’t forget to keep your contours light. It would be a pain to delete later.
Step 4
Eyebrows, Forehead, and Top of the Head Now that we’ve finished the principles, let’s start drawing the top of the head. Where the CENTER LINE meets, draw a shallow curve. I’m trying to avoid a deep curve as I don’t want to focus too much on the brow area. Just try to keep it looking soft and delicate. Once done, draw a small line for the eyebrows and then use the oval as a rough guide to draw the forehead and the rest of the top.
Step 5
Nose If you haven’t read my nose tutorial, go here first. I like to draw the nose without the circles, but you can use that technique if you want. I like to draw the nose to a moderate length, keeping the tip below Line 1. The angle of the nose depends on the face I’m drawing, but I tend to draw them at 50 degrees.
Step 6
Mouth From the base of the nose, create a natural curve that extends down past Line 2 and hugs back towards the face, creating full lips. The corners of the mouth should not extend beyond the nostrils. Then draw the lower lip on top of Line 3. When you’re done, check if there’s enough space for the chin or too much. Adjust lips accordingly to prepare for the next step.
Step 7
Chin and Jawline Remember that your chin and jawline don’t have to follow exact head/face shape guidelines. Extend the jawline beyond the vertical line down the center of the face. When drawing women, I tend to make the jawline soft or rounded, less angular.
Step 8
Neck Draw the front and back of the neck. Avoid drawing the neck with vertical lines. Also try to avoid using straight lines, as this will look very unnatural.
Step 9
Eyeliner and Eyebrows To find where to place your eyes, draw a vertical line from the corner of your lips to the CENTER LINE. The eye should be drawn where these two lines meet. If you want more details on how to draw eyes from the side, visit this tutorial. Follow the general shape of the eyes to form the eyebrows. Keep your brows below Line C for a relaxed look. For a more surprised look, draw your brows a little higher and elongate your eyes along with it.
Step 10
Ears From the jawline, draw a contour for the ears. This outline can be anywhere from near LINE CENTER to Line 2. Learn To Draw Ears.
Step 11
Hair Draw the hairline of the forehead starting from Lines A and B. When you draw the hair at the sideburns (the hair between the ears and cheeks), keep your lines extra light as women have very sparse sideburns. Don’t forget to give your hair volume, for more on that visit my hair tutorial. Happy with what your drawing looks like? Whip your eraser and have fun erasing your rules! To save time, I like to use an electric eraser followed by a kneading eraser to spot tight spots or overlapping lines.
Experiment by drawing many unique faces
When you feel comfortable, try drawing some faces without the ruler on the side.
The examples below have very rudimentary instructions. In fact, if you look closely you can see how sloppy they are.
Once you get the hang of it, you’ll be able to draw realistic and unique women’s faces to your liking! My challenge for you is to fill an entire page in your sketchbook with rows and rows of faces. Make them small so you can fit as many faces as you can (I actually find it harder to draw faces on a large scale).
It may take 5 or more attempts to resolve the issue. If you’ve filled out the entire page but your face doesn’t come out the way you want, go back and follow this guide again.
Like my teaching style and want to make a request? Leave me a comment below and I’ll see what I can do for you 🙂 In the meantime, have fun drawing and see you in another detailed drawing tutorial!


