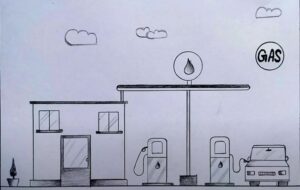
How to Draw a Gas Station with this how-to video and step-by-step drawing instructions. Have fun with this simple step by step lesson for learning how to draw a gas station. This easy gas station lesson is perfect for young children looking to learn how to draw.

Please see Gas Station drawing tutorial in the video below
All the drawing steps are included here, making it fun and simple for you to do! Expect this drawing to take about 20 minutes, but the actual creative process may take longer if the background is also created.
Gas Station Drawing Step by step
Step 1. Form a sign
Form a horizontal rectangle. Next, draw the outline of the oil drop as shown. Then, write an outline of the word “GAS”.
Step 2. Draw the column and base
Form columns by drawing three vertical bars. Then, attach the thin rectangular base of the gas station.
Step 3. Attach the fuel pump
First, draw the thin horizontal base. Now, create the rectangular outline of the gas pump. Then add the square screen on the gas pump.
Step 4. Create gas nozzle
Next, shape the gas tank nozzle attached to the side of the gas pump similar to the illustration.
Step 5. Sketch the tube
Sketch the pipe connecting the nozzle to the fuel pump.
Step 6. Complete the gas station drawing
Add some color to the gas station drawing! First, fill in the oil symbol and text on the sign as well as the base of the gas station with a white pencil. Next, color the columns with a yellow pen. Then, shade the gas pumps and gas dispensers with red and gray pencils.
You can see more easy drawing:


