How to Draw A Fence easy with this how-to video and step-by-step drawing instructions. Pencil drawing tutorials for beginners and kids.

Please see the drawing tutorial in the video below
You can refer to the simple step-by-step drawing guide below
Step 1
In the first step of this fence tutorial, we will start with the horizontal support beams of the fence while also starting on the outline of the vertical bars.
We’ll start with that beam first. For this we will draw a long and thin rectangle.
You may want to use a ruler for this, however you may want to draw this beam freely as we want it to look like it was made of raw wood.
Then draw a line near the top of it and then add a small square to the end of it to give it a bit of 3D.
Finally, you can use some pretty rough vertical lines for the slats at the end of the fence. You can then finish by adding some sharp jagged lines in the ground near the end of the fence for some grass detail.
Step 2 – Next, draw the first bars of the fence
You started drawing the fence bars in the previous part of this tutorial, and now we’re going to draw some more of them.
Using the first vertical line on the left, you can draw a long, pointed shape that we will use for all the bars.
This shape will have another line going down from its tip, and then we will create the same 3D effect we did for the horizontal beam by adding some side down lines.
You can then draw one of these bars to the right of it. There will also be some more jagged lines between them for more grass in the image.
Finally, draw a small circle over the crossbar where each bar is located to make it look like it’s nailed there.
Step 3 – Now draw another bar for the fence
You’re really getting on with it right now! For this step of our fence tutorial, you will draw another bar for your fence.
This shape will look very similar to the previous ones, and will be drawn with the same freehand lines.
Don’t forget to add some grass between them and draw a small circle for the nail to secure it to the crossbeam. That’s all that needs to be done for this step, so now you’re ready to proceed to step 4.
Step 4 – Next, draw another bar for the fence
This fourth step of your fence drawing will see you add another bar before we start on the final details in the next step.
Simply use the steps you’ve used so far to draw the bars for this one, with the only difference being that it will be a bit thinner than the others.
Now that you’ve drawn this bar, there will be a gap near the end of the fence for another, and we’ll be filling that gap soon in the next step.
Step 5 – Now you can complete the final details of your fence drawing
For the fifth part of this fence tutorial, we’ll perfect the details and final elements of the fence so you can color it.
First, you can draw an extra bar on the fence in the previous gap.
You can then perfect details like nails for the slats and the grass between them as you did for all the other slats.
With all the bars drawn, we only have some final details to add! Basically, we will add some slight wavy lines to the wood that make up the fence, and this will help it look more like wood.
Then you are ready to proceed to the final step. Before you do, you can also add some background detail or some other cool addition that you think would work well with this photo. We can’t wait to see what you come up with!
Step 6 – Complete your fence drawing with some colors
Now that you’ve completed all your fence painting steps, you can now relax with some coloring fun!
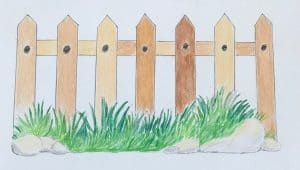
In our image, we used some brown shades for the fence and used green for the grass. Fences can also be painted in a variety of colors, so you have a lot of options in terms of colors you can use!
Be sure to color in any background elements you’ve added, and have fun trying out different art mediums!


