How to Draw a Face Looking to the Side with this how-to video and step-by-step drawing instructions. Pencil drawing tutorials for beginners and all.

Please see the drawing tutorial in the video below
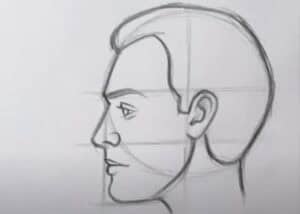
If you want to practice drawing a human face, then this lesson will be of great help to you in which I will show you how to draw a side view face step by step.
The ability to draw a person’s face will certainly come in handy for your future portraiture, so I advise you to follow this lesson carefully.
The position of the face looking to the side is often referred to as the position of the head in the profile. As a result, only half of the face is visible, located on either side of a person’s body or head.
Often, many prominent writers or figures are depicted in this way in textbooks, and such paintings are also used by sculptors and scientists to prepare for the creation of portraits. portraits, sculptures and busts, such as ancient Roman statues.
Material:
- Pencil
- Paper
- Eraser
- coloring pages
Face Looking to the Side Drawing
Step 1. Draw the outline of the head.
You need to describe a distorted oval-like shape with a curve.
Step 2. Add the outline of the nose.
On the left side of the previously drawn contour, add two curved lines.
Step 3. Draw the outline of the mouth and chin.
Below the contour of the nose, add some curved lines of different lengths.
Step 4. Outline the forehead line.
Above the contour of the nose, draw a small curved line.
Step 5. Add contour of hair, ears and neck.
To complete this step, you need to use wavy, curved strokes.
Step 6. Draw the eyebrows and inside the ears.
Draw the eyebrows with a curved line, while adding dashed lines inside the outline of the ears.
Step 7. Sketch the eye.
Under the brow line, add eyes in the form of arcs and short lines.
Step 8. Correct the inaccuracies.
Use the eraser to remove any unnecessary instructions.
Step 9. Color the drawing.
At this stage, choose any color.


