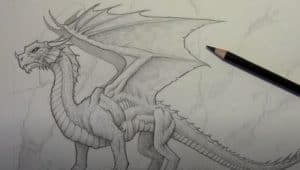
How to draw a dragon by pencil with this how-to video and step-by-step drawing instructions. Pencil drawing tutorial for beginners and everyone.

Please see the drawing tutorial in the video below
You can refer to the simple step-by-step drawing guide below
Step 1
This is another interesting step that I would like to inform everyone, as a lot of artists have problems with this. The right arm is a very important trait of the dragon’s body to master. Observe how the arm does not bend / relax. Notice how not so much muscle spasms or overhangs?
Step 2
Now, look at the difference with a bent arm, and how the muscles protrude and become clear. This is important, because dragons, like most of the four other leg predators, have very muscular limbs, which require a lot of strength to use (arms, legs, wings, neck). For example, the arm of an orangutan is very strong to support its ability to cleverly jump over the largest and tallest trees. If not, where will they get their strength to climb over all those big trees? The same rule applies here. Think of your dragons the exact same way and can even deploy features to your dragons using a good reason why they’re there.
Step 3
This is another super bent arm that shows how muscular a dragon’s arm can be. If you draw a slender dragon and its habitat is in swampy ponds and rivers, the dragon will probably have skinny limbs because it doesn’t need a muscular arm. They may even have a lot of frills and gills to support the survival of the water environment. The environment and diet of the dragon plays an important role in the design of the structure of the organism. Use examples or references from real animals and make them into your own design.
Step 4
Now, when I say that the body is the largest part of the dragon’s body, this is why. Take a look at what’s going on here with wings and arms, how they are compressed in that small body space. The arm itself is large enough to support the long flights that the dragon will begin throughout its life. The arm muscles, mingled in the forearms of the dragon.
Step 5
Below is a drawing of how dragons look consecutively as a life cycle state. As you can see the details, definitions and shadows become more intense. Now let’s move on to the drawing steps to start sketching our dragon.
Step 6
The most important thing when drawing dragons breathing fire, is to pay attention to the shape of the mouth. A closed mouth with a lower jaw tucked under the upper jaw, like a dinosaur. It is better to base your dragons away from past animals similar to dinosaurs. When the dragon’s mouth is open, drawing the lower jaw may be more difficult. You should note the distance between the bottom and the top, make sure the upper part is still a bit longer than the bottom. Also, look at how tight the muzzle is, with the lines defining the skin growling upward, like the snout of a dog.
Step 7
Let’s start this lesson by giving some important instructions and shapes that will eventually form the frame for your dragon that we will draw. Start with a head guide, then draw a long neckline that will connect to the body shape. Drawing within the framework for the rest of the dragon body followed by the guide of large or large wings.
Step 8
We will start drawing shapes or structures for the dragon’s head. The top of the head is like a plate. Draw the edges and then add some grooves to the center of the head which is also called the forehead and the muzzle.
Step 9
Now we will carefully draw the required bottom. As you can see the contour of the liner is sharp and looks like a rough pointed jaw. Small horns on the tip of the nose too.
Step 10
Draw on your dragon face starting with the eye. Color it solid, then outline all the details and definitions to add personality and realism to your dragon.
Step 11
Next, we’ll draw the thick shape of your dragon’s neck that seems to also bend. Sketch on some breasts and then draw shoulders.
Step 12
Continue with drawing your dragon body. As you can see the forelegs are muscular but visually stubborn as well. Draw the toes and then details for toned look.
Step 13
This is a simple step because all you have to do is draw on the front leg and the other leg. Notice that this leg is in a moving position because the dragon is being drawn to look like he is about to take a step or has just finished one step and is now in a
Step 14
Carefully draw the back, bottom of the buttocks and then the stomach and hind legs. Do not forget to draw the feet as well as the toes. Very strong, this powerful dragon stance has.
Step 15
Are you ready to paint the best part of dragon body? Good, then let’s get started. You will start by making arms for the wings. When you’re done, you can paint in the big wings or the big size you see here. The edges should be very rough or look torn. As you know dragons fly daily if not constantly in the sky. All the wear and tear from flying would surely cause damage to the dragon wings.
Step 16
Now you will just draw a tail that looks simple, stiff, static, long and sturdy.
Step 17
Draw the fin like the border between the tail. The more cumbersome or thorns the smaller. Then draw the same frills behind the nape of the dragon.
Step 18
All you have to do here is draw the last leg to be raised.
Step 19
Start the detailed process for your wing. This should include the lining that forms a hangover or a spoon look. Draw the little fingers at the tip of the wing so good.
Step 20
Before you start solving the task of adding the details and definitions needed for your dragon, erase the errors and instructions / shapes that you made in the first step as well as in the entire tut. Once done, you can start the details
Step 21
This is the art line. You can enjoy coloring missions in your dragon. Be sure to get creative and maybe add some texture details.


