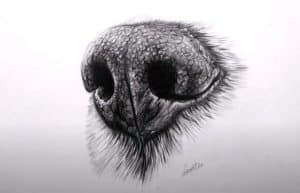
How to Draw a Dog Nose by pencil with this how-to video and step-by-step drawing instructions. Easy drawing tutorial for beginners and kids.

Please see the drawing tutorial in the video below
You can refer to the simple step-by-step drawing guide below
Step 1
So we started this tutorial on how to draw a dog’s nose. Draw a shape that looks like an inverted cone. It is like the outline of the Superman mark. Arrange this shape according to your imagination. If you are drawing the entire dog, this shape should be in front of the head. In our case, this shape is in the center of the paper.
Step 2
That dog’s nose isn’t too complicated, is it? We certainly couldn’t do it without the basic details. First, draw a vertical line that will divide the shape into two equal parts. Then draw the rough contours of the nostrils. Use smooth, circular lines without the need to press hard on the pencil.
Step 3
Connect the circles representing the nostrils at the end of the figure. Follow the bottom edge of our sketch to create an anatomically accurate shape for this dog’s nose. Notice the triangular cleavage that is aligned with the vertically symmetric line. Note the relationship of the vertical lines of this figure with the circles of the nostrils. There must be no clear lines and curves. Try to make the lines as smooth and natural as possible.
Step 4
Now that we are done with the basics of drawing the dog’s nose. Delete unnecessary lines. Check all lines in the end for symmetry and correctness. However, you should not strive for perfect symmetry, which is not found in nature. It looks like a great gamepad button, doesn’t it? In fact, no dog has to tolerate making gamepads.
Step 5
Shadow drawing. Use shadows with a layer to depict the shiny shadows. Two layers of overlapping hatch will help create a heavy shadow effect. As you can see, the most intense shadows lie in the contour of the dog’s nostril.
Step 6
So at the end of this drawing tutorial, you can double check the correctness of all contours and shapes. After that action, you can delete all the guide building lines previously drawn, to make the drawing of your cartoon eyes look more complete. Congratulations, this is a great job!
We hope this has been a really helpful guide. If you want to practice drawing animal body parts, be sure to check out these dog paw tutorials and cat eye tutorials.
Don’t forget that your feedback is the best reward for our work. We look forward to hearing from you right here or on our social networks.


