How To Draw A Coffin easy with this how-to video and step-by-step drawing instructions. Easy drawings for beginners and all.

Please see the drawing tutorial in the video below
You can refer to the simple step-by-step drawing guide below
Step 1
There will be quite a few straight edges that we will be drawing in this coffin tutorial, so you may want to have a ruler on hand to make things easier!
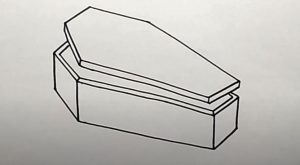
We will draw this coffin from left to right and it will be positioned so that the lid is raised slightly for a more dynamic feel.
You should start by drawing the lid above the coffin. It will have three sides and you can draw a parallel line on that edge to make it look like there is some depth.
Then we’ll draw some simple line details to make it look as if it were made of wood. You can also use a ruler to draw a large cross on the lid of the box.
Finally, using the reference image, you can draw four more lines to form the head of the coffin itself.
Step 2 – Next, finalize the outline for the coffin lid
For the second part of your coffin drawing, we will complete the outline for the lid. You can add two more lines from the ones you drew earlier.
These lines will get a little closer together as they go, shown in the reference figure. You can also add some other lines for more wood details once you’ve finished the outline.
Step 3 – Draw the next hole for the coffin
We will be drawing the opening of the coffin in this third step of the how to draw coffin tutorial.
To do this, you use some more lines running parallel to the shape of the coffin lid so that the shape of the opening mirrors the shape of the lid.
This can actually be a bit tricky to get right, so you might want to carefully refer to the reference images as you draw and try to duplicate them as they appear there.
Then you’ll be ready to paint some more coffins in the next step, so go ahead!
Step 4 – Now let’s start drawing more of the coffin itself
This fourth step of your coffin drawing should be pretty simple and straightforward! Using a ruler, all you need to do is extend two more lines.
One will be vertical, coming down from the corner of the coffin. The other will be more horizontal and slightly longer, running at a slight angle parallel to the rest of the coffin.
You can then add a small circle for the coffin’s handle on the side and then you’ll be ready for some final details in the next section.
Step 5 – Complete your coffin drawing
We’ll perfect the picture in this step of the coffin tutorial and you’ll be ready to color in the final step.
First, we have one more edge of the coffin to draw and this will be the narrowest of the sides closest to us as a viewer.
You can then finish by drawing a line through the center of both the longest and shortest sides of the coffin, adding some handles once you’re done.
Before proceeding to the last step, you can also add some details of your own. You can paint the background or add some text to the coffin.
If you want a Halloween feel to the image, then maybe you can draw a vampire emerging from the coffin.
How would you finish your coffin?
Step 6 – Finish your coffin drawing with some colors
This is the final step of your coffin painting, and in it we will complete the picture by adding some color to it.
Coffins are usually made of wood, so we reflected on this by using some lighter brown colors for the coffin itself.
We used slightly darker shades for the handle and the inside of the coffin to add some more dimension to the image.
These are the colors we used for our example, but you can also use some of your own shades instead.
Coffins are often associated with sombre funeral events, so you can seek out this look using softer mediums like watercolors and crayons.
What colors and mediums would you choose for your images?
Your coffin drawing is done!
That will bring us to the end of this tutorial on how to draw a coffin. Coffins and funerals are not usually associated with joy, but we hope that you enjoyed creating this picture.
We’ve tried to make it easy for you to take this photo by breaking it down into smaller steps, so hopefully we’ve made it easy and satisfying for you!
There are many ways that you can change the details in this image to create a more personalized image.
We’ve covered a few ways you can work around this, but now it’s up to you to show off your creativity.
Be sure to check out our website for more amazing drawing tutorials like this one. We upload new ones regularly, so our big collection is always bigger! Remember to keep subscribing to never miss out.
We would also appreciate it if you would share your coffin drawings on our Facebook and Pinterest pages for us to see!


