How to Draw A Cherry Blossom Tree with this how-to video and step-by-step drawing instructions. Tree drawing tutorial for beginners and everyone.

Please see the drawing tutorial in the video below
You can refer to the simple step-by-step drawing guide below
Step 1
The best way to make your life easier when drawing is to plan accordingly in advance. For this reason, we will draw some outlines with a pencil in this step of the cherry blossom tree drawing tutorial.
Using the reference image as a guide, you can use a pencil to draw the stem and winding branches of the cherry blossom tree.
You can then draw some irregular circles on the branches, as these will guide you as you begin to draw each flower later on.
Once satisfied with these pencil instructions, you can use the pen to start drawing on some of the branches and also the outline of the flower clusters, as shown in our reference image.
Step 2 – Next, draw some details for the flowers on the tree
You can start adding some details in this part of your cherry blossom tree drawing. To do this, you can add some small circles inside the flower border that you drew in the previous step.
You can also go through some pencil lines of the branches in this step to start building them up.
Step 3 – Now draw some more flowers on the tree
In this step of our tutorial on how to draw a cherry blossom tree, you will continue to add some pen details to the branches and flowers.
For this part, we will add some detail to the top flower clusters on the tree.
As with the others, you will draw lots of small circles inside the outline of the flowers in general.
You can also draw some thin overhanging branches to add even more detail.
Step 4 – Continue adding some details to the flowers of the plant
We will continue to review pencil outlines with your pen for this part of your cherry blossom tree drawing.
You can add more details to the next inflorescence as you did in the previous few steps. As you can see in our reference image, you can also keep adding some lines on the branches.
Step 5 – Finalize the details for the flowers and branches in this
For this step of our how to draw cherry blossom tree tutorial, you will continue with what you did in the previous few steps.
That means you will complete the outline of the final branches and inflorescences. You can also perfect the lines for the trunk and roots of the tree.
Once you’ve drawn all the outlines, we can move on to some final details in the next step.
Step 6 – Now, complete the final details and erase the pencil lines
It’s almost time to add some pretty colors to your cherry blossom tree painting, but before you do, a few final details need to be added first.
You can start by adding even more floral patterns to the flower clusters on the branches. This will add a lot of depth to the flowers that will be the star of this drawing!
You can then add some wavy lines all over the branches and trunk of the tree to make it look more wooden.
Then you can draw some small shapes from the branch to make it look like the petals are drifting down.
Once you’ve drawn all the final details, you can then erase all the pencil lines from the first step, as you won’t need them anymore.
Before moving on to the final step, you can also add some details of your own. Perhaps you could paint a nice background for the image to really complete it!
Step 7 – Complete your cherry blossom tree drawing with some colors
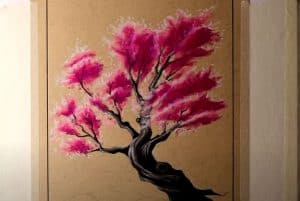
The final step of this cherry blossom tree tutorial will be to add some pretty colors to it to make it really come to life!
The cherry blossom tree is well known for its pretty pink color, and that’s what we did in our reference image example.
Although the tree has a very specific color scheme, you can also alter it using a number of different art media and tools.
For a painting like this, it’s always appropriate to go with a softer medium like watercolor paints and crayons to create a more discreet, vintage look to the image.
It would also look great if you used more vivid media, so how do you think you would end it?
Your cherry blossom tree drawing is done!
We hope that you really enjoyed this tutorial on how to draw a cherry blossom tree!
When you first see the image that you are going to draw, it may look intimidating, but our goal with this tutorial is to show you how easy and fun it can be!
Now that you have finished drawing and coloring, you can continue to add your own details and elements to it.
Whether you change the details, add backgrounds or experiment with art mediums, we know it will look great!


