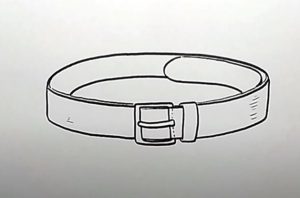
How to Draw a Belt easy with this how-to video and step-by-step drawing instructions. Easy drawing tutorial for beginners anf kids.

Please see the drawing tutorial in the video below
You can refer to the simple step-by-step drawing guide below
Step 1
Let’s start by drawing our belts in the simplest way. With the help of a very light line, we outline a normal flat oval.
Step 2
Now, using a pair of simple, slightly curved lines, we give the belts a more volumetric look.
Step 3
With the help of some very light lines, we outline a belt buckle. Next, we outline the edges of the waist using a curve.
Step 4
Now, with the help of dark and smooth lines, we carefully draw all the waist lines. Remove unwanted lines from the belt drawing.
Step 5
When you draw shadows, try to make them light and smooth. For even darker shadows, use a different hatch layer.
Today we showed you how to draw a belt. Many of our readers love to draw clothing elements and ask us to create new lessons on the subject of clothing and accessories. We have drawn a wide variety of dresses, shirts and hats, and in the future we will fill a category called “Clothing” with a very different variety of clothing.


