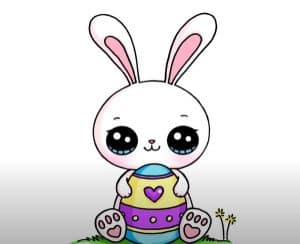
Easter Bunny Drawing easy with this how-to video and step-by-step drawing instructions. Easy animals to draw so cute for beginners and everyone.

Please see the drawing tutorial in the video below
You can refer to the simple step-by-step drawing guide below
Step 1
Start off by drawing a circle. This will help you outline the bunny’s head.
Step 2
Use a long and curved line to surround an irregular shape below the circle. This forms the rabbit’s cheeks and chin.
Step 3
Draw the ears. For each ear, use a long, curved line to surround a narrow shape.
Step 4
Draw the bunny’s arm. For each arm, draw a long curve twice as long as itself. This line must be connected to the side on its outer edge, but open to the inside. Then draw short and curves at the ends of each foot to differentiate the fingers.
Step 5
Draw an oval between the feet. Notice how the feet overlap in shape. This will become the egg.
Step 6
Draw the bunny’s legs. Extend a long, curved line from the back of the egg, taking note of how the knee and foot are bent before rejoining the egg. Then, draw a short curve extending from the egg toward each knee. Draw curves at the end of the foot to indicate the toe.
Step 7
Remove the instruction lines from the beginning.
Step 8
Add details to the face. Wrap a smaller elongated shape in each ear. Start drawing the eyes by drawing two curves, then draw a pair of ovals on each line. Draw two smaller circles in the inner oval for more details. Draw a curved shape on each to form an eyebrow. Draw a rounded, upside-down triangle to form the nose. Draw dots on each of its sides and extend the curves to indicate the beard. Use a series of curves to form the mouth, tongue, and teeth. Finally, add more fur to the cheeks, erasing as needed.
Step 9
Use the curves to draw the grass behind the bunny. Draw lines, circles, zigzags, and other shapes on the egg to decorate it.
Step 10
Coloring the Easter bunny.


