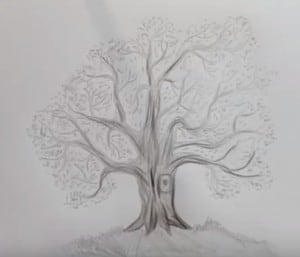
How to Draw a Tree by pencil with this how-to video and step-by-step drawing instructions. Pencil drawing tutorial for beginners and all.

Please see the drawing tutorial in the video below
You can refer to the simple step-by-step drawing guide below
Step 1
Mind works in a special way: first it announces a general picture, and then it focuses on the details. That is why you should not start your drawing with details-you need a general basis first.
Draw a very general form of the final image with a few subtle lines and dots. Use HB pencils for this, and do not press too hard. In this way its drawing will not be part of the final drawing – they will not be registered by your camera or scanner (I had to use some heavy Photoshop magic to make the strokes This is visible to you!)
Step 2
Draw the trunk. Remember to make the lower part wider. The bigger the tree, the shorter and thicker the trunk.
Step 3
Draw a branching on top of the trunk.
Step 4
Add multiple affiliates to each branch and use the same method to make them look natural. Keep the refinement!
Step 5
Use quick, jerking motions of your hand to draw the overall shape of the crown. Keep it uneven and ragged.
Step 6
Use the same manner to draw smaller “clouds” of leaves within the crown. Leave a few areas empty to reveal the branches beneath, just where they make the most interesting structures.
Step 7
Add thickness to the branches not concealed by the leaves.
Step 8
Before you start shading, decide which part should be bright and where the shadow is. You can define it with a subtle cross-hatching.
Step 9
Take the 2B pencil and make sure it’s sharp. Use it to draw the texture of the trunk. Keep in mind that white areas are an important part of texture!
Step 10
Use both 2B and 5B (or softer) pencils to shade the trunk according to your planned lighting. Feel free to press hard with the softest pencil to get the darkest shade when it’s necessary, but don’t overuse this effect! The fewer black parts in the picture, the more impressive they are.
Step 11
Take your HB pencil once again to sketch the leaves. Draw them as loose curls, quickly, using the jerking motion.
Step 12
Each branch also has its own crown (the small “clouds” you have drawn before). You need to shade them as if they are separate trees.
First, use 2B pencil to draw darker curves on the dark side. Lightly tap at first to see if you are doing the right thing.
Step 13
Use the softest pencil to add a few dark accents in the deepest shadow. This will improve the contrast of the crown. Also, make sure that the all the “clouds” seem slightly darker than the “sky”—leaves are not transparent! You can ensure this effect by adding more leaves with the HB pencil in the lighter areas.


