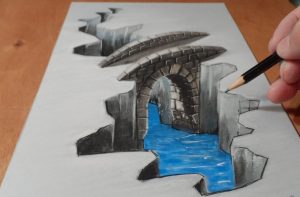
Bridge Drawing by pencil with this how-to video and step-by-step drawing instructions. 3D drawing easy for beginners and everyone.

Please see the drawing tutorial in the video below
You can refer to the simple step-by-step drawing guide below
Step 1:
In this step, we will make the drawing lines to create the water shape for the bridge. In this step we will have to make the water lines part of the bridge. To do this, I first had to make the lines shape the water surface of the bridge. We will create the shape of the river. Now we start drawing a circle of straight lines to represent the water flow.
Step 2:
After the first step, we will now work on creating the bridge shape of the action. In this step we will have to create the shape of the bridge in our sketch of the bridge. So I have to create the shape of the bridge. To create the bridge, I had to draw many curved lines to create the shape. Then I had to create a circle to create the shape of the border roofs of the bridge sketch.
Step 3:
In the three steps of our sketch, we have to create the water shape of the other side of the bridge in How to Draw a Bridge. In this step we will have to make the water part of the other side of the bridge. To make this side, I also had to make the other lines shape the water for our bridge sketch. Then, to create the shape of the other side of the river, I had to draw curves and circles to represent the flow of the other side of the water.
Step 4:
In the fourth step of our sketch, we have to draw the river lines of our bridge in How to Draw a Bridge. In this step, we will have to create the shape under the river water and also the shape of the bridge. Then to make it, first of all, I had to make different lines to create the shade of the water.
Step 5:
In the fifth step of our sketch, we have to make the bricks of the bridge drawing of How to Draw a Bridge. In this step, I have to create the shape of the bricks of the bridge. So first of all, I have to make the shape of the brick bridge. To create the shape of the bridge bricks, I had to draw many vertical and horizontal lines that crossed each other to create the shape of the bridge bricks. Learn more about 3d snake drawing.
Step 6:
In the sixth step of our sketch, we have to make the underpass and the foot of the bridge in How to Draw a Bridge. In this step, I have to shape the bridge, and also the tunnel for the water to flow. So I have to create the shape of the bottom underpass. To get the shape of the bottom tunnel, I had to draw many curves to form the shape of the tunnel. Also, let’s create both the bottom and the back of our bridge sketch.
Step 7:
In the seventh step of our sketch, we have to shade the bottom left of the bridge in How to Draw a Bridge. In this step I have to create the shape of the bottom left part of the bridge in our sketch. Now, I have to create the shape of the bottom of the left bridge. To create the shape of the bottom of the bridge, I had to draw any shapes and shadow lines in the sketch.
Step 8:
In the eighth step of our sketch, we have to shade the bridge of the bridge sketch in How to Draw a Bridge. In this step I have to make the bridge shape and the shade of the bridge and on the brick. So I had to create the shape and shade of the tail of the bridge. Then, to give shape and shade to the lower part of the bridge, I had to draw lines to give shape and shade to the tail of the bridge. Learn more about drawing landscapes.
Step 9:
In the ninth step of our sketch, we have to create the bottom roofs of the right side of the bridge in How to Draw a Bridge. In this step, I have to shape the bottom roof of the right side of the bridge. Then I had to create the right shape and shade for the lower vertices of our bridge. To shape and shade the bottom roof of the bridge, I had to draw many lines in it.
Step 10:
In this step we will set the color blue to create the shape of the bridge’s water. In this step, I have to make the shape of the bridge’s water outline. Now, I have to make the shape of the bridge’s water to be blue. To create the shape of the bridge’s water, I had to paint in blue to create the shape of the water.
Step 11:
In the eleventh step of our sketch, we have to create the plan shape of the bridge in How to Draw a Bridge. In this step, I have to make the shape of the plan of the bridge sketch. Now, I have to create the shape of the bottom of the bridge. Then, to make the body of the foot, I had to draw lines to give shape and shade to the ground of the bridge.
In this tutorial, we have to learn the sketch of How to draw a bridge. In this video, you’d have to learn a video of How to draw bridge sketches and drawings. This video tutorial is also beneficial for beginners in sketching, also helpful for the kids to learn quickly. We hope you love this tutorial and learn many kinds of things. Cool Drawing Idea website also provides you the types of tutorials to learn and get much skill. So, you’d have to keep following and keep watching the video to learn. How to draw different sketches and drawings to learn quickly to draw the bridge.


5