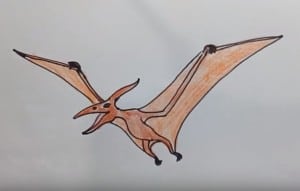
how to draw a pterodactyl from jurassic world step by step for kids

Please see the detailed tutorial video below
You can refer to the simple drawing tutorial steps below
Step 1
Draw a small circle as a guide for the head of pteranodon. Circle is not perfect. It’s just a guide. Leave enough room for the top and right wing.
Step 2
Draw a long thin triangle on the left side of the circle as a guide for the head of the pteranodon mouth. Draw a long line like a thin triangle under the first section as a guide for the lower part of the pteranodon mouth.
Step 3
Draw a triangular line like the top right of the circle as a guide for the top of the pteranodon. This triangular shape should be smaller than the first two.
Step 4
Draw another circle to the right of the pteranodon head as a guide for the upper half of the body. This circle must be of the same size as the first circle. Do not draw it too far from your head, otherwise your pteranodon will end up too long.
Step 6: Add two lines between the top of the pteranodon and the body to the neck and one bow to the lower right for the lower half of the body.
Step 5
Draw two straight lines in the lower right part of the body as a guide for the foot. Draw two long curves on the tip of the pteranodon body as a guide for the head of the wing. The guide to the left wing should be placed near the top. Guide to the right wing starts inside the circle. The longer this line, the longer the wings.
Step 6
Use a few lines to complete the instructions for the wing. Draw two short lines for the wing folds on the left and one long line for the bottom part of the wing on the right.
Step 7
Outline the shape of the eye pteranodon in the circle near the head. The shape is similar to a soccer ball. When you get the shape on the right, darken the lines. Add an inner circle for the actual eyeball. Polished eye pteranodon except for a small circle to represent the glare. Add a few lines around the eyes for more details. Draw a few lines above the eyes for the bone structure and a few lines below it for wrinkled skin.
Step 8
Add a few curves below the eyes to show the body structure of the skull. Draw the nose like a small slot on the left. Use the original triangle like triangle to guide drawing the top of the mouth. Follow the instructions of the guide but make the shape thinner. The mouth of pteranodon should extend to the inside of the head.
Step 9
Use the triangular border at the bottom as a guide to draw the bottom of the mouth. Follow the basic path of the guide as you darken the lines and form the lower jaw. Add a few lines in the shape of the jaw to the inside of the mouth and tongue.
Step 10
Use the top shape of the pteranodon as a guide to drawing the top. Follow the instructions and darken the lines. Add an extra line near the bottom to structure the eye’s body on the other side.
Step 15: Draw the neck under the pteranodon head using the first line as a guide. Make the neck thinner when you darken the lines.
Step 11
Use the original lines on the body as a guide to drawing the top of the pteranodon wings. Follow the instructions of the guide and make the arm section thicker. Draw the nails with small curves near the middle of the wing. Draw the upper part of the wing on this side of the body in the same way. First follow the instructions and make the shape of the arm thicker. Then draw three small nails using three short curves near the middle of the wing.
Step 12
Draw the rest of the pteranodon wing using the first line as the guide. Follow the basic instructions of the guide to create the front part of each wing. The wing tip is the fourth digit of the hand. The “pink” fingers of pteranodon should go to a final point. Darken the other guides to complete the shape and structure of the pteranodon wings. Add a small line on the shoulder to the wing on this side. Follow the path leading to the bottom of the wing but add a little more curve.
Step 13
Use the lines below the body as a guide to pteranodon foot prints. Follow the basic path of the guide and make the top part thicker. Add the nails at the bottom with curves. Draw the leg on the other side of the body in the same way but make it smaller because of the view.
Step 14
Use the remaining lines and shapes. For a clearer look, remove as much as possible the initial instructions. Do not worry about erasing all instructions. and make the lines clear
Step 15
Finally finish the work by coloring the dinosaur notes


