How to Draw The Legend Of Zelda with this how-to video and step-by-step drawing instructions. Easy cartoon drawing tutorial for beginners and all.

Please see the drawing tutorial in the video below
Legend Of Zelda Drawing step by step
Step 1. Draw the Head
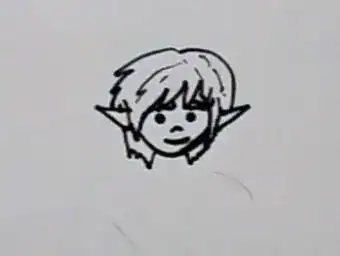
Start by drawing the shape of Link’s head and adding pointed elf-like ears.
Draw two round eyes. Next, add a pair of eyebrows above the eyes. Then, create a curved outline for the nose and mouth.
Draw Link’s thick, messy hair around the head and ears. Remember to erase any overlapping lines.
Step 2. Draw the Body
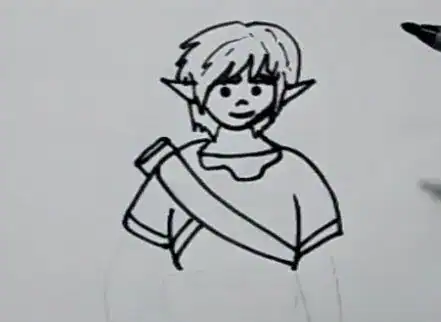
Draw the outline of Link’s neck below the head. Then, create a tunic shape that reaches his chest. Draw the outline of his belt across his chest. Then, draw a cylinder behind his back to form the top of his quiver, where he stores his arrows as shown.
Step 3. Attach the Sleeves

Draw the short sleeves of the tunic. Now, add the longer sleeves of the undershirt. Next, draw a bracelet to protect his left forearm. Then, sketch out the shape of his hand.
Step 4. Draw the Belt and Finish the Tunic

Add two belts around the waist. Then, draw a small pouch attached to the belt. Finish the bottom of the tunic.
Step 5. Draw the Legs

Draw the pants outline and add the bottom hem of the pants on each leg. Then, draw the long boots below the hem of the pants.
Step 6. Color the Legend of Zelda drawing
Let’s color the Legend of Zelda Link drawing! First, color the skin peach and the eyes black. Next, color the hair and eyebrows with a dark yellow. Now, color the tunic blue with white highlights. Use brown for the belt, belt, gloves, bracelets, and shoes. Then, color the zipper and the bottom hem of the pants with orange. Use cream for the inner shirt and pants. Finally, color the quiver with gray.
You can see more Legend of Zelda drawings:


