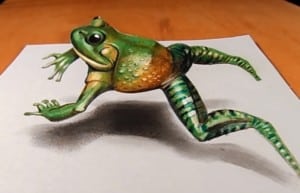
How to draw a 3D frog easy step by step with this how-to video and step-by-step drawing instructions. 3D drawing easy for children and everyone.

Please see the drawing tutorial in the video below
)
You can refer to the following simple drawing steps
Step 1
As you can see, the form of the subject is distorted a little. This is necessary to give it depth. To draw a nice 3D drawing, you must do your best to reproduce the drawing distortion of the drawing accuracy. In the case of 3D frogs, the simplest way is to use grid coordinates. Both your object and paper must be divided into an identical number of squares. Number of squares. Do not forget that the size of your drawing will depend on the size of the square on your paper. Then, in each box you will recreate a part of the picture.
Step 2
The final result will be the entire image. If a line of the figure continues from square to square, make sure you draw it from one to the other smoothly, without breaking it. Do not forget that your drawing is a whole, the squares are just there to help you.
Step 3
At first, the frogs are dancing, and you can use a drawing grid and tutorial in the video to draw the actual frog.
Step 4
Finally we will clear the grid, and then the drawing is ready to be painted or colored.
Step 5
Shading for 3D drawing depth. Determine which side of the ball drawing is down. We will draw outlines in shadows, remember the shadows.
Step 6
The closer to the light source, the more saturated the ball. It is best to draw a shade with a soft pencil. First lightly outline the shadows and then darken them to suit you.
Step 7
Remember that the darker the place where it touches the surface of the object.
Step 8
Yes, your drawing is ready! To increase the 3D effect, you can trim your drawing by example.


