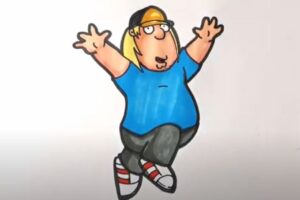
How to Draw Chris Griffin From The Family Guy with this how-to video and step by step drawing instructions. Cartoon drawing tutorial for beginners and all.

Please see Chris Griffin drawing tutorial in the video below
Chris Griffin Drawing Step by Step
Step 1
In this first step, what you’re going to do is draw out the paths and shapes to create the basic frame for Chris Griffin. Start by drawing a large round blob shape for his head and sketching guiding lines on his face. Next draw the upper part of his body i.e. the torso, it looks like a big oversized wooden crate, from that shape draw his arms and feet and draw out the guides for the legs .
Step 2
Now, in this step, what you’re going to do is draw Chris’s face and the lower half of his body. Start by drawing the shape of his face, then draw the hat first, then the hair. Now create two circles that look almost like they are attached to the cap of the hat for the eyes. From the center of the cap, draw a line to start shaping the nose. Now draw the mouth and chin as shown. On the right side, draw the combined shape of his stomach and chest, and finish the step by drawing the shape of his legs or pants.
Step 3
Here, in the final drawing step, what you’re going to do is draw out the flap of his hat a little more and draw in the pupils of his eyes. Now move down a bit and draw his fingers on his left hand and then the stripes on his ugly looking shoes. Erase all the guides and shapes that you drew in step 1 and move on to the final step.
Step 4
And here’s what your drawing will look like when you’re done. All you have to do now is color him and add him to your drawing collection or post your finished artwork to the website. That goes for the tutorial on how to draw Chris Griffin from The Family Guy, see you later.


