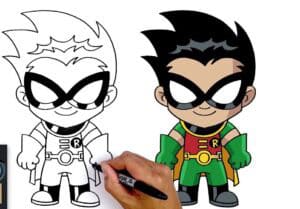
How to Draw Robin with this how-to video and step-by-step drawing instructions. Cartoon Drawing tutorials for beginners and everyone.

Please see Robin drawing tutorial in the video below
I recommend completing the drawing lesson in which I will show you how to draw Robin step by step. This tutorial is great for beginners or kids and anyone interested in comics will love it.
Robin is a superhero, Batman’s partner, who fought with him against crime in the city. At different times, different characters hid under this pseudonym. These characters are usually Batman’s assistants, but sometimes act as separate heroes. Robin can appear in many Batman comics, cartoons, TV series and cartoons, as well as video games.
I am sure you will enjoy this lesson and will help you to improve your art skills. I suggest you get your drawing tools ready and start this lesson now if you are ready.
Robin Drawing Step by Step
Step 1. Draw the outline of the character’s head.
Draw an oval and also add some curved lines inside and below it.
Step 2. Add facial features.
Draw eyes, nose, mouth, chin and ears using curved lines of different lengths.
Step 3. Outline Robin’s hairline.
At the top of the head, add some curves of different lengths, as shown.
Step 4. Add the Robin mask.
In the center part of Robin’s face, draw curves near his eyes and nose.
Step 5. Describe the character’s arm.
To the right and left of Robin’s torso, depict the arms with curved lines.
Step 6. Draw the elements of the costume.
Add sleeves, waistband, and the bottom of the suit using arcs, ovals, and lines.
Step 7. Sketch the cape and collar.
Use straight and curved lines with different sizes as shown.
Step 8. Add details.
On Robin’s outfit, add circles, as well as straight and curved lines of different sizes.
Step 9. Color the drawing.
To color Robin, use black, beige, gray, red, green, and brown.


