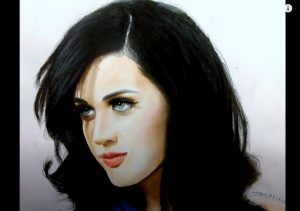
How to Draw Katy Perry by Pencil with this how-to video and step-by-step drawing instructions. Celebrity drawings for beginners and everyone.

Please see the drawing tutorial in the video below
You can refer to the simple step-by-step drawing guide below
Step 1
It’s been a long time since last time. It’s good to be back in the new year! We’ll start with the oval in the rectangular box. Try to start at least an inch and a half from the top of the paper. From the left side, leave an inch of space. This will allow you to get her full form. Stay close to the shape and draw gently. Use a 2HB pencil…not a 2H pencil or hard pencil. It will leave a terrible mess in your paper.
Step 2
Draw a light slant from the forehead to the chin. This ground near the middle of the bottom line. The jaw line is parallel to the right face of the box. As you noticed, the back of the oval looks huge. All this helps to create the volume of the picture.
Step 3
Draw an oval as shown inside the right half of the first oval. At the midpoint between the top of the head and the bottom of the chin, draw a line from “a” to “b”. That is the position for the eyes. At the top for the eyebrows draw a horizontal line (blue) from “c” to “d”. Also, where the cheekbones will be drawn a horizontal line (blue) from “e” to “f”.
Step 4
Draw a curved line down the face for the center. Draw two downward slanting lines from the eyebrows and a seam (red) for the bridge of the nose.
Step 5
This is very helpful for the balance of the face. You will find from the hairline to the tip of the eyebrow – from the tip of the eyebrow to the end of the nose – from the bottom of the nose to the bottom of the chin – they are divided into three equal sections. Most faces look like this with some minor adjustments. Amazingly the hairline is the starting point. Observe the three even parts and work your way up, following the image Step 5.
Step 6
Lightly outline and divide the lower third of the face into a third to define the position of the mouth. When you lengthen the top of the brow line into an oval shape and the jawline higher, that defines the position of the ears. If you need to erase to mold your lines, go ahead. It’s all part of finding the right shape. Erase the midline of the nose. Basically duplicate the other lines that indicate the planes of the face. Take your time. You are doing well.
Step 7
At this point, you will add the ears below the extended brow line and to the right of the jawline. Delete the bottom of the second oval and add the neck. Sketch it lightly because you’ll be free to improvise.
Step 8
You are making wonderful progress. Now for the magical change, filling the guide structure with Katy Perry’s hair, cherries, eyebrow position, eyes, nose, mouth, earrings and shoulders. Erase and reshape. Concentrate and look closely at the picture. Take your time to mold her.
Step 9
“Tools Of The Trade” I absolutely love giving tools and tips. In the image Step 9. Let me introduce you to ELECTRIC PENCIL CUTTING MACHINE. It will save you a lot of time. Also, I used a 0.7 size interchangeable mechanical pencil. The lead sizes used are HB and 2HB. I also used that awesome graphite pencil at 9B. Then paint white acrylic and a small brush for those little highlights. Also, rubber kneading remover, Q-tip, stump mix, etc. Make your painting eye-catching!
Step 10
You know I have to step this up and show you how I get these insights. Some techniques are shown in the gray Step 10 figure. Press the Escape key on your keyboard to enlarge the image.
Step 11
You have been to all these paths. You can stop here with a great picture. Look at the hair and see the highlights and strokes for the strands. Her eyes should be accented with lovely long dark lashes. Although it’s not very detailed, you have a great work of art.
Step 12
As you continue with small circles on her face for an even tone. When you mix with a tissue or your Q-tip, When you patiently run each pencil stroke through your hair, once you have mastered those tips and techniques, it will bring you to the moment of victory. this. A work of art created by your own hands. It’s so lovely. I hope you enjoyed my guide.


