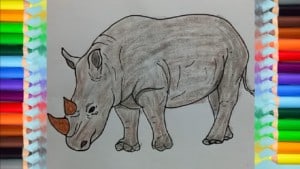
How to Draw a Rhino step by step easy for beginners with this how-to video and step-by-step drawing instructions. Easy animals to draw for children and everyone.

Please see the drawing tutorial in the video below
You can refer to the simple step-by-step drawing guide below
Step 1
Let’s draw a rhino! Trace a squiggly line across the page for the back. Make sure the lines start to come down.
Step 2
From there, tracing a squiggly oval shape for the head, your rhino looks like it is leaning down for water! Add a line for the mouth.
Step 3
Trace a large triangle shape at the front of the head and a small triangle at the top of the head for horns.
Step 4
Color in an oval and trace two lines, one above and one below for baggy eyes.
Step 5
From there, trace a short line across for the neck, then draw a short, stumpy leg, making it wide at the top but smaller at the bottom.
Step 6
The second front leg is really hiding behind the first, so trace thin lines along the outside of your first leg.
Step 7
Draw a curbed line across the bottom of your rhino for the belly.
Step 8
Draw the first hind leg by tracing a simple line at the back of your rhino?his leg is hiding too!
Step 9
Now, trace two long lines, making sure they are squiggly and wide apart for the last thick leg. Trace a thin line right along the leg for the tail.
Step 10
Add some wrinkles on rhinoceros body. Finally coloring, it may be gray or brown. There’s your rhino!


